Magazine and print designers must be versatile in many areas. Design and typography is a must, image color correction is a good bonus, but to be able to work on your own, which means creating print materials from beginning to an end, you have to know lots of stuff about prepress process. Creating error free print ready PDF files is one such thing.
Some 15 years ago, there was no PDF output. To export pages of your magazine to printing house you had to print pages to a .ps (PostScript) file. This process was called Print To File. Then the prepress team in the printing house sent those files to a RIP (Raster Image Processor) which converted PostScript files so that the image setter can recognize them and create four sheets of film, each in one process color.
Later came PDF output. But in the beginning it was not direct exporting to PDF. Again, you had to create Postscript files. Print ready files were then “distilled” in an application called Distiller, which resulted in the PDF file that was ready for print.
Today InDesign can directly generate PDF files without the need for Distiller. Of course, Distiller is still available to convert PostScript files into PDFs, if necessary, but directly exporting PDF files is the recommended method of creating PDF files. It’s faster and easier to generate PDF files through direct export.
Again, as in other production related posts we will deal only with the necessary options that will be of use to you.
All of the screen shots in this post are from my custom preset which is set up from the joboptions file I got from the printing house with which I work very often.
Before we start it is good to point out that the images in your publication have to be in CMYK color mode and at least in 225 dpi resolution. 300 dpi is the default one, but if you cannot have images at 300 dpi, 225 dpi will work fine. You can go lower than this, but than this will affect the quality of the images in print.
If you are not sure if all of your images and documents are print ready, check out our post about preflight which will help you determine if your layout files are error free.
An Overview of PDF settings
For a start, let’s go through some of the important settings in export PDF menu.
- Adobe PDF Preset indicates whether a default preset or a user-created preset is being used. If you’ve started with an existing preset and modified some of its settings, the preset name is followed by the word “modified”. You will always work with your own presets so we will show you how to create one of your own. Other presets can be really handy. For example, Web preset is good if you have to export small sized PDFs, with 72 dpi resolution, that you have to send via email to your clients or team members. Print preset is fine for printing PDF files on your local printer. This will shorten the time that the printer needs to process PDF files and images are exported in 150 dpi, which is just enough for printing on conventional desktop or office printers.
- Compatibility indicates the minimum version of Acrobat required to read the file. The label in parentheses shows the PDF file specification that applies; for example, “Acrobat 5 (PDF 1 .4)” indicates that the resulting PDF will be compatible with Acrobat 5 .0 and later, and that the file meets the PDF 1 .4 specifications. Proper compatibility also affects other applications that must process the PDF, such as imposition software and RIP. While an Acrobat 9/10-compatible file may seem more up to date, your RIP may not allow you to use it. Consult with the prepress team in your printing house about the requirements for your RIP, to determine the appropriate compatibility setting.
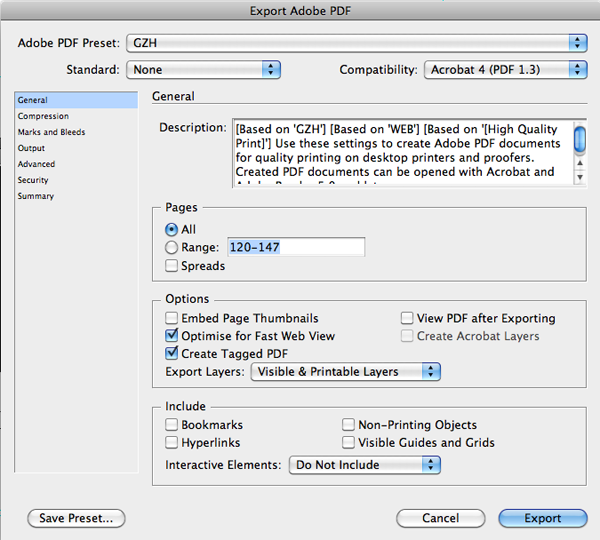
- General includes basic file options, such as page range. The choices such as Bookmarks, Hyperlinks, and Tagged PDF affect only interactive PDFs and do not pertain to print-ready PDFs.
- Compression allows you to specify settings for compression and downsampling of images. Additional options let you compress text and line art, and crop images to frame limits. Always use compression settings, because if you do not compress the images in the PDF, the file will be huge in size and it may cause problems to the RIP when processing those files.
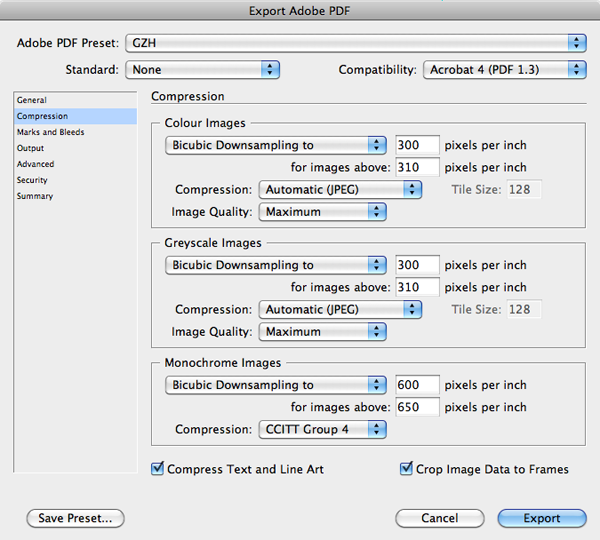
Always compress your images. This will save you time and PDF files will be significantly smaller.
- Marks and Bleeds options let you include crop and bleed marks, as well as page information, bleed, and slug area.
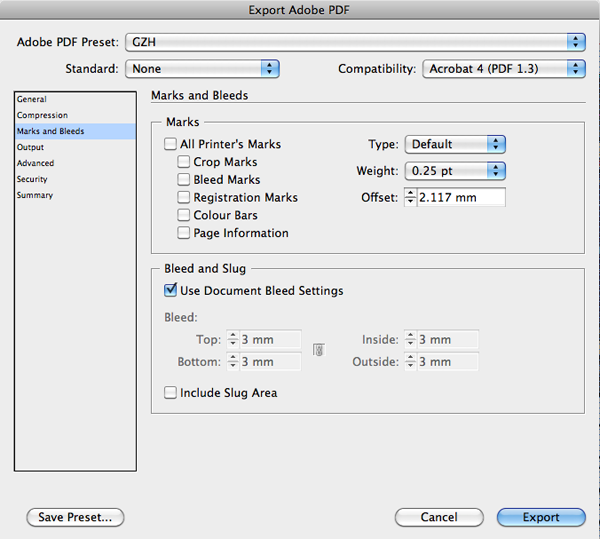
Printing house with which I work does not need printer’s marks at all, so every check box is empty. I set up bleed in my documents by default so I checked this option.
- Output controls how colors are converted (or preserved), based on your choices and the color management settings in effect.
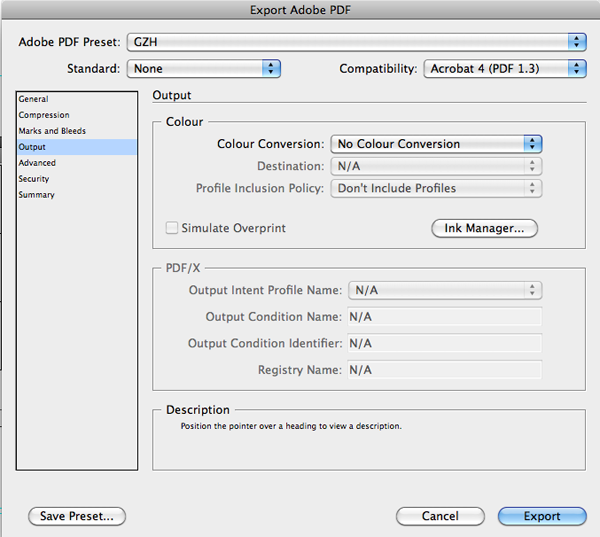
Important option here is to set color conversion to “No Color Conversion”
- Advanced controls font embedding and subsetting, OPI comments, transparency flattening, and the inclusion of JDF information.
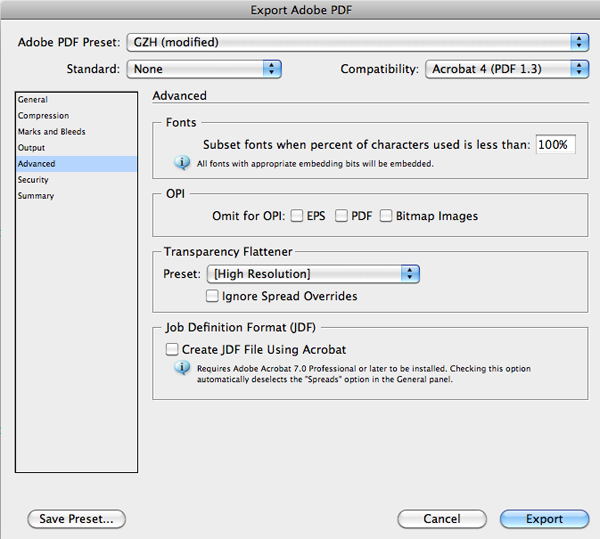
Select “High Resolution” in Transparency Flattener option.
- Embedding includes the entire character set of a font in the resulting PDF; subsetting is a form of embedding that includes only characters used in the document, and results in a smaller file size. It is advised that you never create a PDF without embedding or subsetting fonts.
Default PDF presets
Here we will discuss the three most commonly used presets. You can modify each of these and re-save them. As you can see from my own preset drop down menu I modified all of them to suit my needs. I will point out which options to change. By adjusting them you will get presets that will suit you much better, PDF files will be smaller in size and quality will be sufficient for the intended purpose.
Smallest File Size
Appropriate for online distribution or e-mail attachments. Do not use it in commercial printing, where reliable viewing, online proofing, and reproduction of the original content is crucial.
The Smallest File Size option aggressively compresses and resamples image content, and converts all RGB, CMYK, and grayscale content to the sRGB color space. This may result in noticeable color shifts from the original artwork.
Settings include:
- Compatibility: Acrobat 6 .0 (PDF 1 .5), which maintains live transparency and layers
- Color Images: Bicubic downsampling to 100 dpi. You can change this to 72 dpi, which is sufficient for display viewing; Compression = Automatic (JPEG); Image Quality = low. You can change it to medium.
- Grayscale Images: Bicubic downsampling to 150 dpi. Again, you can change it to 72 dpi; Compression = Automatic (JPEG); Image Quality = Low. Change to medium.
High Quality Print
Intended for printing on in-house and desktop printers. Any RGB, Lab or spot-color content will remain in its original color space, not converted to CMYK.
Bare in mind that printing with these settings in no way will correspond to the final, traditionally printed output. For the most accurate printing resemblance, print your pages on proofing printers. For that you will use either custom made preset or the Press quality preset.
High Quality Print settings include:
- Compatibility: Acrobat 5 .0 (PDF 1 .4), which maintains live transparency
- Color Images: Bicubic downsampling to 300 dpi. You can change this to 150 dpi, which is sufficient for desktop and in-house printers; Compression = Automatic (JPEG); Image Quality = Maximum.
- Grayscale Images: Bicubic downsampling to 300 dpi. Again change it to 150 dpi; Compression = Automatic (JPEG); Image Quality = Maximum .
- Output: No color conversion; includes tagged source profiles.
Press Quality
The settings of the Press Quality preset create a PDF that converts color content to CMYK using the specified destination profile, which locks the output to a particular device.
- Compatibility: Acrobat 5 .0 (PDF 1 .4), which maintains live transparency
- Color Images: Bicubic downsampling to 300 dpi; Compression = Automatic (JPEG); Image Quality = Maximum.
- Grayscale Images: Bicubic downsampling to 300 dpi; Compression = Automatic (JPEG); Image Quality = Maximum.
- Monochrome images: Bicubic downsampling to 600 dpi; Compression = CCITT Group 4.
- Output: Convert content with profiles to destination; preserve color numbers for untagged content; maintain spot colors
Some printing houses will say it is OK to send them PDF files created with this preset but most of them will ask for you to create PDF files with their joboptions file, which leads us to the next chapter.
Custom made PDF preset
Each printing house has its own rules and regulations regarding the way that the PDF files should be made. Some like to have a whole magazine outputted as one large PDF file, some like it page by page. Some prefer all page marks to be on, some like them to be off.
Talk with your printing house and ask them what kind of PDFs should you send them.
The majority of printing houses will send you their joboptions file which you will save in User/Library/ Application Support/Adobe/Adobe PDF/Settings on Mac and on a PC, they’re stored in C:Documents and SettingsUserApplication DataAdobe Shared DocumentsAdobe PDFSettings.
This is the easiest option for you, since the joboption preset will be visible in your presets menu. All you need to do is to select it and all of the settings will be adjusted automatically.
If they do not have joboptions file ready and you need to adjust preset on your own ask the prepress team what options to include and what not to include.
To create custom made PDF preset, follow the next steps:
- Choose File > Adobe PDF Presets > Define.
- Choose the appropriate preset for a starting point. I recommend adjusting the High Quality Print preset. The majority of the settings that you need for print output are already set up in this preset and you will need to adjust only few of them.
- Click the New button, and name the preset. I always give it a name that is the same as the magazine or the printing house for which it is intended.
- To modify the bleed settings, choose Marks and Bleeds, and set the appropriate bleed amount for your workflow. It is not sufficient to check the option to Use Document Bleed Settings. If a document has been set up with zero bleed, the resulting PDF will be without bleed. Rather, set the bleed amount to an appropriate number (usually 3 mm or 0.125 in).
- Choose any printer’s marks you wish to add. Ask printing house prepress team, which ones, if any, to choose.
- Click OK to save the PDF preset
- To save the PDF preset give it a brief name (InDesign adds the extension .joboptions to the name), and save the preset.
- To load a predefined PDF preset, choose File > Adobe PDF Presets > Define and click the Load button. Navigate to the supplied file and click Open. The preset is added to the list of available presets in InDesign.
This concludes the topic of PDF file creation. As always, if you have any questions or misunderstandings please feel free to contact us or leave a comment.

Magazine and print designers must be versatile in many areas. Design and typography is a must, image color correction is a good bonus, but to be able to work on your own, which means creating print materials from beginning to an end, you have to know lots of stuff about prepress process. Creating error free print ready PDF files is one such thing.
Some 15 years ago, there was no PDF output. To export pages of your magazine to printing house you had to print pages to a .ps (PostScript) file. This process was called Print To File. Then the prepress team in the printing house sent those files to a RIP (Raster Image Processor) which converted PostScript files so that the image setter can recognize them and create four sheets of film, each in one process color.
Later came PDF output. But in the beginning it was not direct exporting to PDF. Again, you had to create Postscript files. Print ready files were then “distilled” in an application called Distiller, which resulted in the PDF file that was ready for print.
Today InDesign can directly generate PDF files without the need for Distiller. Of course, Distiller is still available to convert PostScript files into PDFs, if necessary, but directly exporting PDF files is the recommended method of creating PDF files. It’s faster and easier to generate PDF files through direct export.
Again, as in other production related posts we will deal only with the necessary options that will be of use to you.
All of the screen shots in this post are from my custom preset which is set up from the joboptions file I got from the printing house with which I work very often.
Before we start it is good to point out that the images in your publication have to be in CMYK color mode and at least in 225 dpi resolution. 300 dpi is the default one, but if you cannot have images at 300 dpi, 225 dpi will work fine. You can go lower than this, but than this will affect the quality of the images in print.
If you are not sure if all of your images and documents are print ready, check out our post about preflight which will help you determine if your layout files are error free.
An Overview of PDF settings
For a start, let’s go through some of the important settings in export PDF menu.
Always compress your images. This will save you time and PDF files will be significantly smaller.
Printing house with which I work does not need printer’s marks at all, so every check box is empty. I set up bleed in my documents by default so I checked this option.
Important option here is to set color conversion to “No Color Conversion”
Select “High Resolution” in Transparency Flattener option.
Default PDF presets
Here we will discuss the three most commonly used presets. You can modify each of these and re-save them. As you can see from my own preset drop down menu I modified all of them to suit my needs. I will point out which options to change. By adjusting them you will get presets that will suit you much better, PDF files will be smaller in size and quality will be sufficient for the intended purpose.
Smallest File Size
Appropriate for online distribution or e-mail attachments. Do not use it in commercial printing, where reliable viewing, online proofing, and reproduction of the original content is crucial.
The Smallest File Size option aggressively compresses and resamples image content, and converts all RGB, CMYK, and grayscale content to the sRGB color space. This may result in noticeable color shifts from the original artwork.
Settings include:
High Quality Print
Intended for printing on in-house and desktop printers. Any RGB, Lab or spot-color content will remain in its original color space, not converted to CMYK.
Bare in mind that printing with these settings in no way will correspond to the final, traditionally printed output. For the most accurate printing resemblance, print your pages on proofing printers. For that you will use either custom made preset or the Press quality preset.
High Quality Print settings include:
Press Quality
The settings of the Press Quality preset create a PDF that converts color content to CMYK using the specified destination profile, which locks the output to a particular device.
Some printing houses will say it is OK to send them PDF files created with this preset but most of them will ask for you to create PDF files with their joboptions file, which leads us to the next chapter.
Custom made PDF preset
Each printing house has its own rules and regulations regarding the way that the PDF files should be made. Some like to have a whole magazine outputted as one large PDF file, some like it page by page. Some prefer all page marks to be on, some like them to be off.
Talk with your printing house and ask them what kind of PDFs should you send them.
The majority of printing houses will send you their joboptions file which you will save in User/Library/ Application Support/Adobe/Adobe PDF/Settings on Mac and on a PC, they’re stored in C:Documents and SettingsUserApplication DataAdobe Shared DocumentsAdobe PDFSettings.
This is the easiest option for you, since the joboption preset will be visible in your presets menu. All you need to do is to select it and all of the settings will be adjusted automatically.
If they do not have joboptions file ready and you need to adjust preset on your own ask the prepress team what options to include and what not to include.
To create custom made PDF preset, follow the next steps:
This concludes the topic of PDF file creation. As always, if you have any questions or misunderstandings please feel free to contact us or leave a comment.
adminlogo