Many times inexperienced designers and publishers wonder why their images do not look in print like they look on the screen. Well, they will almost never look the way they look on screen. Many factors can influence the final print output. From different screens which are not calibrated to photographs that are not professionally retouched and to colors settings that are not correctly adjusted.
In this post we will deal with how to choose and adjust the correct Photoshop color settings and how to assign those settings to images.
If you want your images to print correctly you have to apply correct setting according to the printing method you will be using.
Lets dig in into Photoshop Color settings. There are many settings here and it would take a book to explain them all in detail. Besides all of the Photoshop Color Settings are explained in detail in numerous web sites and you don’t need to know all of them. I will show you which ones you need.
Importing and Selecting ICC Profiles
Before we start, talk with your printing house prepress team and ask them which ICC profiles they use. If they are using the profiles that are not included in Photoshop Color Settings ask them to send you appropriate icc files. When you receive them, place the files in /Library/ColorSync/Profiles
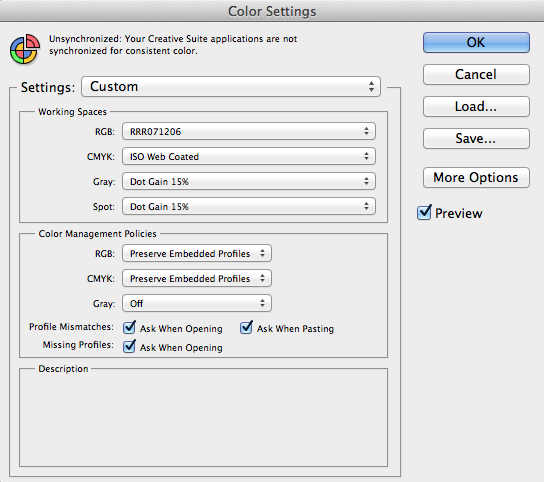
Now you can open Photoshop and in color settings panel (Edit/Color Settings) you will have to load this new profile. On the right you can click Load and navigate to the destination where you have saved your icc profile file.
This profile will now be visible in Settings drop down menu. After you have chosen your profile all other options will change according to the selected profile.
Lets skip to working spaces.
All of these settings will be automatically selected when you choose appropriate profile from Settings drop down menu.
RGB working space is the working space for your RGB images. Many Photoshop experts retouch images in RGB mode, so it is essential that the right profile is selected and that you correct images with this profile applied.
CMYK working space will be applied to CMYK images.
Gray and spot will be used when you work on greyscale images and on images with spot colors.
Color management policies tells you how Photoshop deals with newly opened images, especially the ones that have different or no color settings applied than yours since printing photographs with different profiles applied can result in color mismatch.
We need to tell Photoshop how to handle these color profile mismatches, and we do that in the Color Management Policies section of the Color Settings dialog box. By default, Photoshop is set to Preserve Embedded Profiles, which will keep the original color profile intact, and that’s rarely something that we want so we need to change these options.
Applying Profiles to Images
Here we will explain two scenarios. One is when you work with one printing house and you use only one color profile and another scenario is when you are working with few printing houses each with their own color profiles, or when you are using different printing methods or inks.
The next description is for all of you that are working with same printing house and use only one color profile.
Ask When Opening and Ask When Pasting checkboxes for the Profile Mismatches option should be selected. Each time you open an image in Photoshop you will be asked if you want to keep the embedded profile or to replace it with the working one, and the working one is the one you want to apply and the one you need.
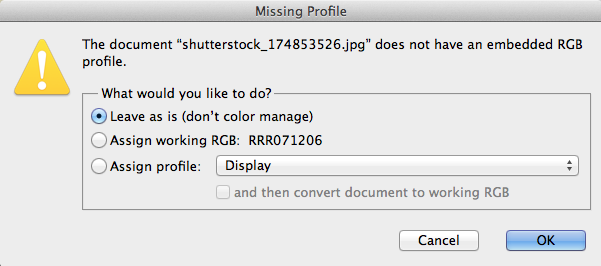
Missing profiles checkbox should also be ticked and if the image you open does not have any profile applied the Missing profile window will open and you will apply your working profile.
In this way you will apply the correct color profile to your images as soon as you open them. So the next time you open an image with wrong color profile you will be presented with the “Missing profile” dialog box and you will have to tick the Assign working check box.
What happens if you work with few printing houses that use different profiles?
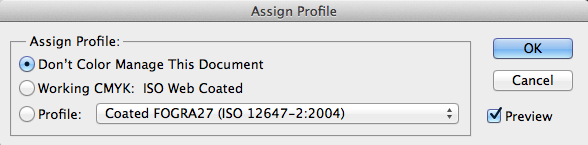
Well, then your best option is to uncheck Ask When Opening and Ask When Pasting checkboxes. Also leave all the options to Preserve Embedded Profiles. This will result in images retaining their original profiles and then you can choose which one you need to apply.
In this way each time you open an image that has different profile assigned, you will have to assign correct profile manually.
To do this go to Edit/Assign Profile. This dialog box looks almost the same as Missing profile dialog box but here you can choose from all of the profiles that are available and you will choose the one you need.
All of these processes are the same regardless if you open an RGB or CMYK image.
After you apply the steps described above, you can start color correcting your images if they need color correction.
Conclusion
These are the several steps that you have to take to assure that your images will print as closely to the original as they can.
In the end I advise you to invest some money in color proofs. Each printing house have their own proof devices which simulate the printing method they use. You can inspect them and if you are not satisfied you can correct the pages which are not satisfying.
You will have to sign those proofs if satisfied and they will serve as an evidence if something goes wrong in the printing process and you can always talk with the printing house representative why the final print is not equal to the color proofs which you were shown to approve.

Many times inexperienced designers and publishers wonder why their images do not look in print like they look on the screen. Well, they will almost never look the way they look on screen. Many factors can influence the final print output. From different screens which are not calibrated to photographs that are not professionally retouched and to colors settings that are not correctly adjusted.
In this post we will deal with how to choose and adjust the correct Photoshop color settings and how to assign those settings to images.
If you want your images to print correctly you have to apply correct setting according to the printing method you will be using.
Lets dig in into Photoshop Color settings. There are many settings here and it would take a book to explain them all in detail. Besides all of the Photoshop Color Settings are explained in detail in numerous web sites and you don’t need to know all of them. I will show you which ones you need.
Importing and Selecting ICC Profiles
Before we start, talk with your printing house prepress team and ask them which ICC profiles they use. If they are using the profiles that are not included in Photoshop Color Settings ask them to send you appropriate icc files. When you receive them, place the files in /Library/ColorSync/Profiles
Now you can open Photoshop and in color settings panel (Edit/Color Settings) you will have to load this new profile. On the right you can click Load and navigate to the destination where you have saved your icc profile file.
This profile will now be visible in Settings drop down menu. After you have chosen your profile all other options will change according to the selected profile.
Lets skip to working spaces.
All of these settings will be automatically selected when you choose appropriate profile from Settings drop down menu.
RGB working space is the working space for your RGB images. Many Photoshop experts retouch images in RGB mode, so it is essential that the right profile is selected and that you correct images with this profile applied.
CMYK working space will be applied to CMYK images.
Gray and spot will be used when you work on greyscale images and on images with spot colors.
Color management policies tells you how Photoshop deals with newly opened images, especially the ones that have different or no color settings applied than yours since printing photographs with different profiles applied can result in color mismatch.
We need to tell Photoshop how to handle these color profile mismatches, and we do that in the Color Management Policies section of the Color Settings dialog box. By default, Photoshop is set to Preserve Embedded Profiles, which will keep the original color profile intact, and that’s rarely something that we want so we need to change these options.
Applying Profiles to Images
Here we will explain two scenarios. One is when you work with one printing house and you use only one color profile and another scenario is when you are working with few printing houses each with their own color profiles, or when you are using different printing methods or inks.
The next description is for all of you that are working with same printing house and use only one color profile.
Ask When Opening and Ask When Pasting checkboxes for the Profile Mismatches option should be selected. Each time you open an image in Photoshop you will be asked if you want to keep the embedded profile or to replace it with the working one, and the working one is the one you want to apply and the one you need.
Missing profiles checkbox should also be ticked and if the image you open does not have any profile applied the Missing profile window will open and you will apply your working profile.
In this way you will apply the correct color profile to your images as soon as you open them. So the next time you open an image with wrong color profile you will be presented with the “Missing profile” dialog box and you will have to tick the Assign working check box.
What happens if you work with few printing houses that use different profiles?
Well, then your best option is to uncheck Ask When Opening and Ask When Pasting checkboxes. Also leave all the options to Preserve Embedded Profiles. This will result in images retaining their original profiles and then you can choose which one you need to apply.
In this way each time you open an image that has different profile assigned, you will have to assign correct profile manually.
To do this go to Edit/Assign Profile. This dialog box looks almost the same as Missing profile dialog box but here you can choose from all of the profiles that are available and you will choose the one you need.
All of these processes are the same regardless if you open an RGB or CMYK image.
After you apply the steps described above, you can start color correcting your images if they need color correction.
Conclusion
These are the several steps that you have to take to assure that your images will print as closely to the original as they can.
In the end I advise you to invest some money in color proofs. Each printing house have their own proof devices which simulate the printing method they use. You can inspect them and if you are not satisfied you can correct the pages which are not satisfying.
You will have to sign those proofs if satisfied and they will serve as an evidence if something goes wrong in the printing process and you can always talk with the printing house representative why the final print is not equal to the color proofs which you were shown to approve.
adminlogo