
In this tutorial I will show you how to create a color picker icon from some blends, gradients, and simple shapes. This icon works great for web design project and in user interface design. Moreover, you can use the techniques in this tutorial in other icon, web, and print projects. Let’s get started!
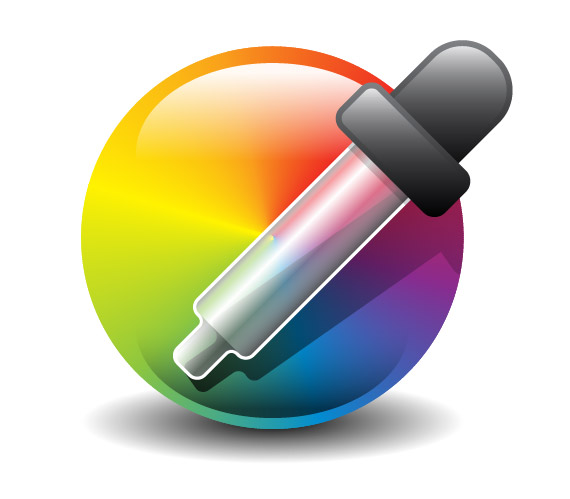
Final Image
Take a look at what we will be creating.
Preparation
There isn’t much preparation needed for this tutorial. All you need is Illustrator CS4 or CS5 and a beginning to intermediate knowledge of how to use the program.
Step 1
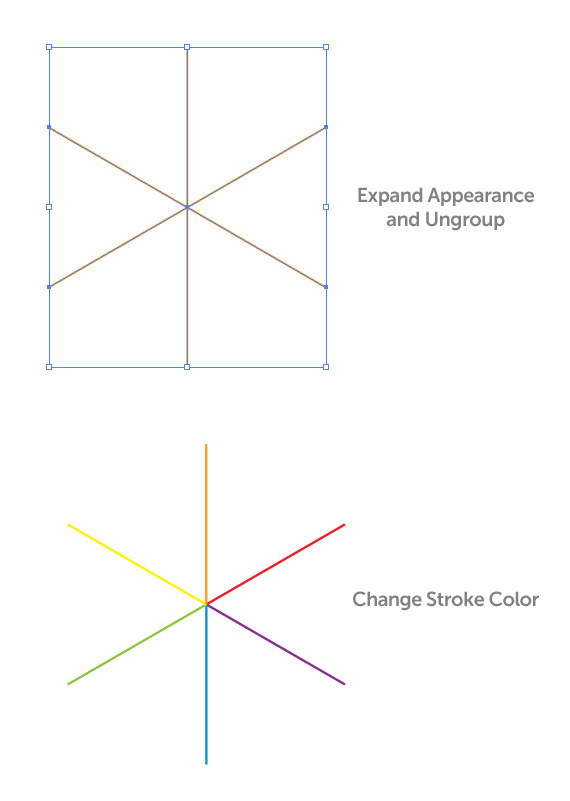
With the Line Segment Tool (/), create a path that is about 80 px tall. Make sure the new path has a 1 pt stroke and change the stroke color to an orange.

Step 2
With the line selected, choose Effect > Distort and Transform > Transform. In the Transform Effect dialog, change the number of copies to 6, select the bottom center reference point in the Reference Point Locator, and set the Angle to 60. Generating six copied will place one copy in front of the original. We want to do this so we will have a complete blend in the next couple of steps.

Step 3
With the transformed line selected, choose Object > Expand Appearance and Ungroup (Command +Shift + G). Change to stroke colors to primary (red, yellow, blue) and secondary colors (orange, purple, green).
Step 4
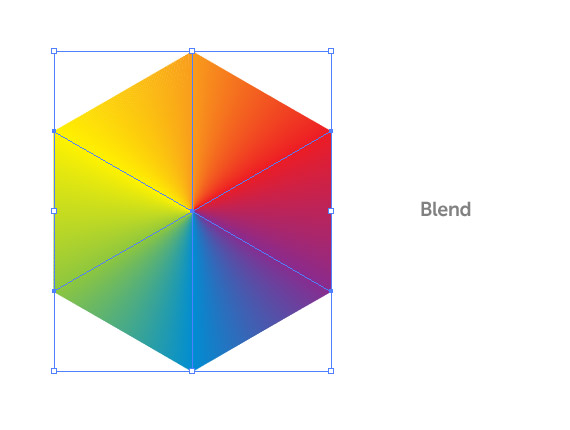
Select all the strokes and choose Object > Blend > Make (Command + Alt/Option + B).
Step 5
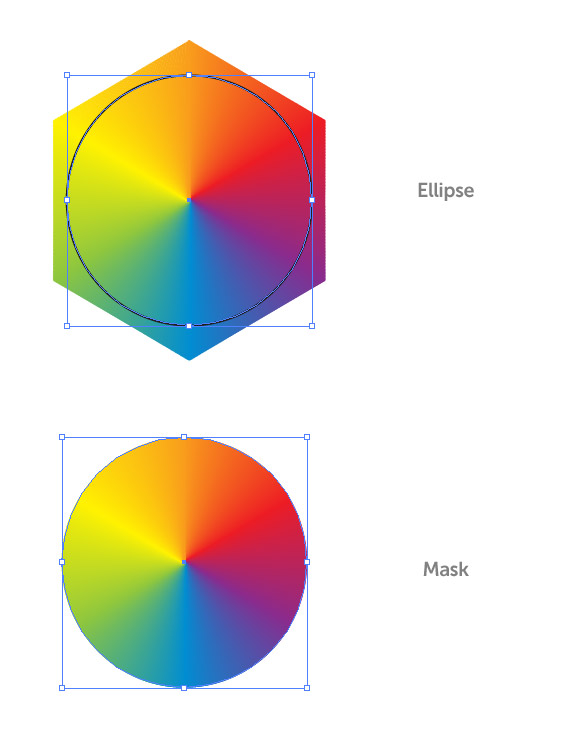
Create an ellipse within the blend with the Ellipse tool (L) centered over the blend. Select the ellipse and blend and choose Object > Clipping Mask > Make (Command + 7).
Step 6
Create another ellipse about half the height and slightly smaller width as the previous ellipse. Place it close to the top side of the masked blend. Change the fill of the new ellipse to a linear gradient and in the Gradient panel, change the Location to -90, change both colors stops to white, change the opacity of the second color stop to 0, and change the middle point Location to 30.
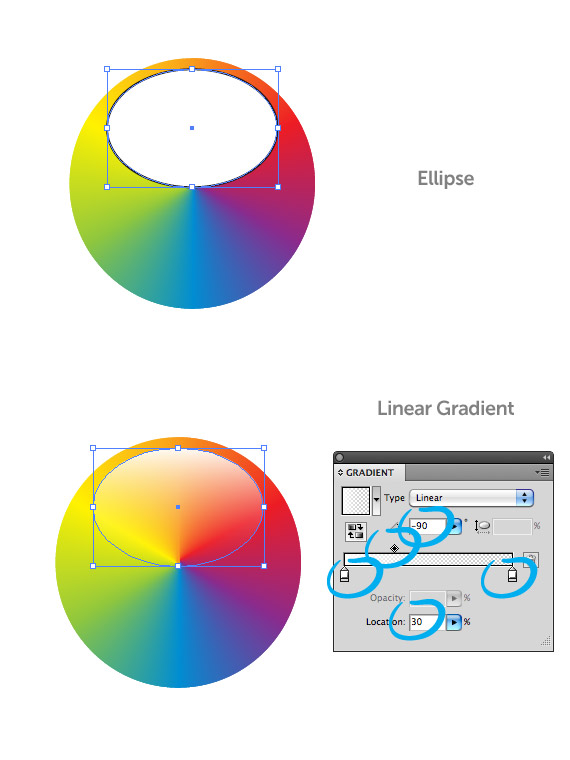
Step 7
Copy (Command + C) the highlight ellipse and Paste in Front (Command + F). Move and rotate the copy to the bottom side of the mask blend. Change the first color stop in the gradient to a light gray and set the Blending Mode to Multiply from the Transparency panel.

Step 8
Create another ellipse about the size of the main masked blend and fill it with a radial gradient. Make sure the first color stop in the radial gradient is black and the second is white. Squish the ellipse and place it behind all other artwork. Set the Blending Mode of the ellipse to Multiply and change the opacity to 50 percent.

Step 9
Now that we have the color wheel done, we can concentrate on the eyedropper. Create a rectangle with the Rectangle tool (M) about three fourths the height of the color wheel. Create another smaller rectangle about a fifth the height of the main rectangle and half its width and place at the bottom of the main rectangle.
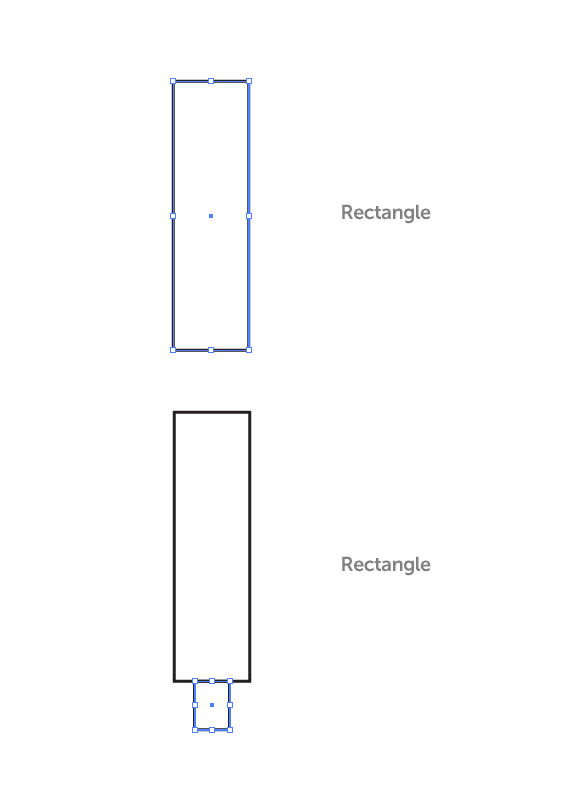
Step 10
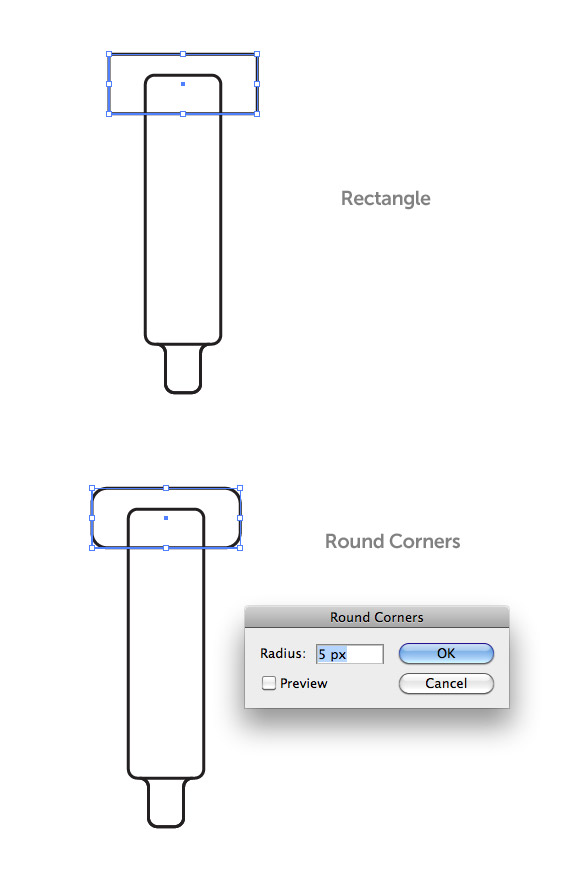
Select both rectangles and press the Unite button from the Pathfinder panel. Next, choose Effect > Stylize > Round Corners. In the Round Corner Dialog, change the Radius to 3 px. Next, choose Object > Expand Appearance.

Step 11
Copy (Command + C) the eyedropper shape and Paste in Front (Paste in Front). Create another rectangle that covers the bottom part of the eyedropper. Select the main copy and the smaller rectangle and press the Intersect button from the Pathfinder panel.

Step 12
Create a rectangle towards the top of the main eyedropper shape. Make the new rectangle about double the width and one sixth the height of the main eyedropper shape. Next, choose Effect > Stylize > Round Corners and in the Round Corner Dialog, change the Radius to 5 px.
Step 13
Create another rectangle slightly wider and about a fourth the size of the main eyedropper shape. Place the shape towards the top of the previous rectangle and round the corners 15 px.

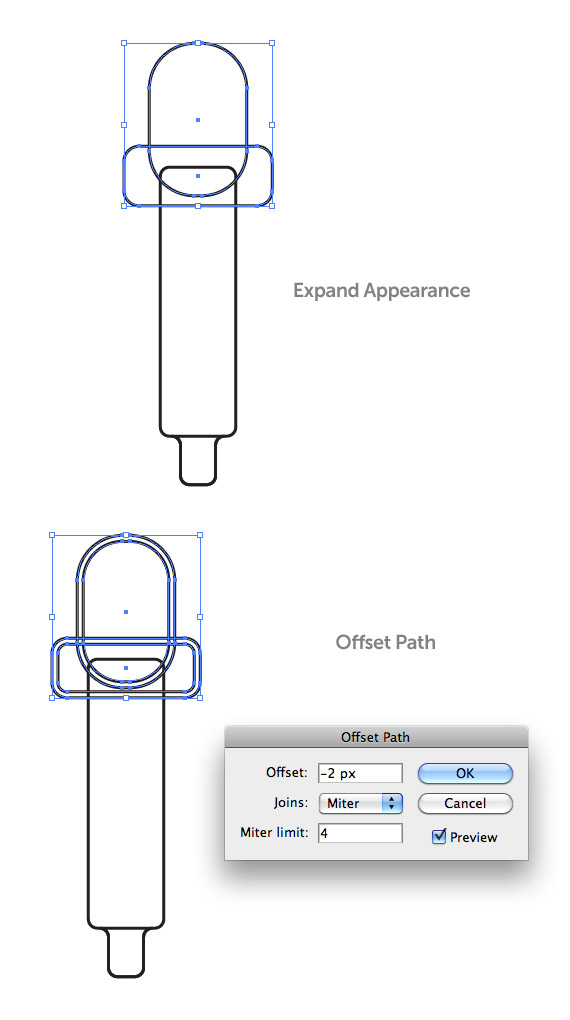
Step 14
Select the top eyedropper shapes and go Object > Expand Appearance. Next, go Object > Path > Offset Path and in the Offset Path dialog change the Offset to -2 px. This value might be different depending on the original size of your shapes.
Step 15
Now that we have all the shapes done for the eyedropper, we can place them over the color wheel we already created. Creating the shapes and not filling in before we place the dropper makes it easier to see the white and transparency parts of the gradients when we fill them. So, place your eyedropper shapes over the color wheel at a 45 degree angle.

Step 16
First, select the smaller rectangle and its offset from the top of the dropper and go Object > Arrange > Bring To Front (Command + Shift + ]). Select the original top shapes (not the offsets) and fill with a linear gradient. Change the first color stop in the gradient to a dark gray and the second color stop to black. Change the Angle to -90 in the Gradient panel.
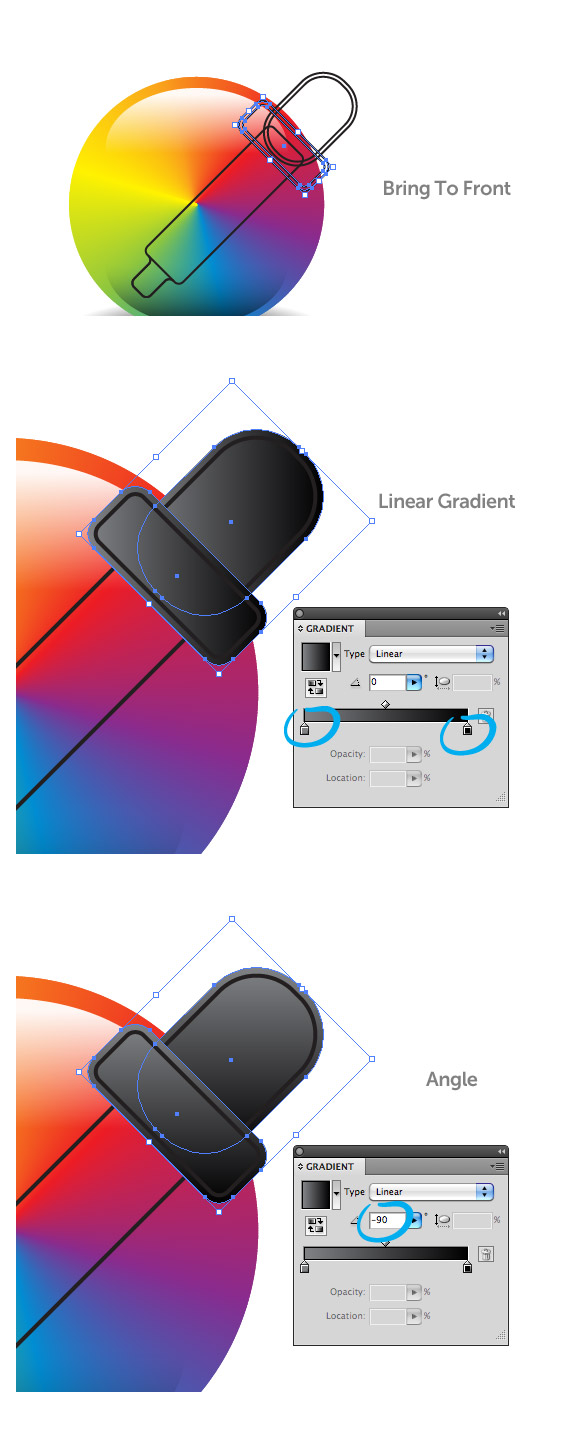
Step 17
Select the offsets of the upper rectangle shape and fill with a linear gradient. Change both color stop in the gradient to white. In the Gradient panel, change the opacity of the first color stop to 80 and the second to 0. Change the Angle to -90 and change the middle point Location of the gradient to 15.
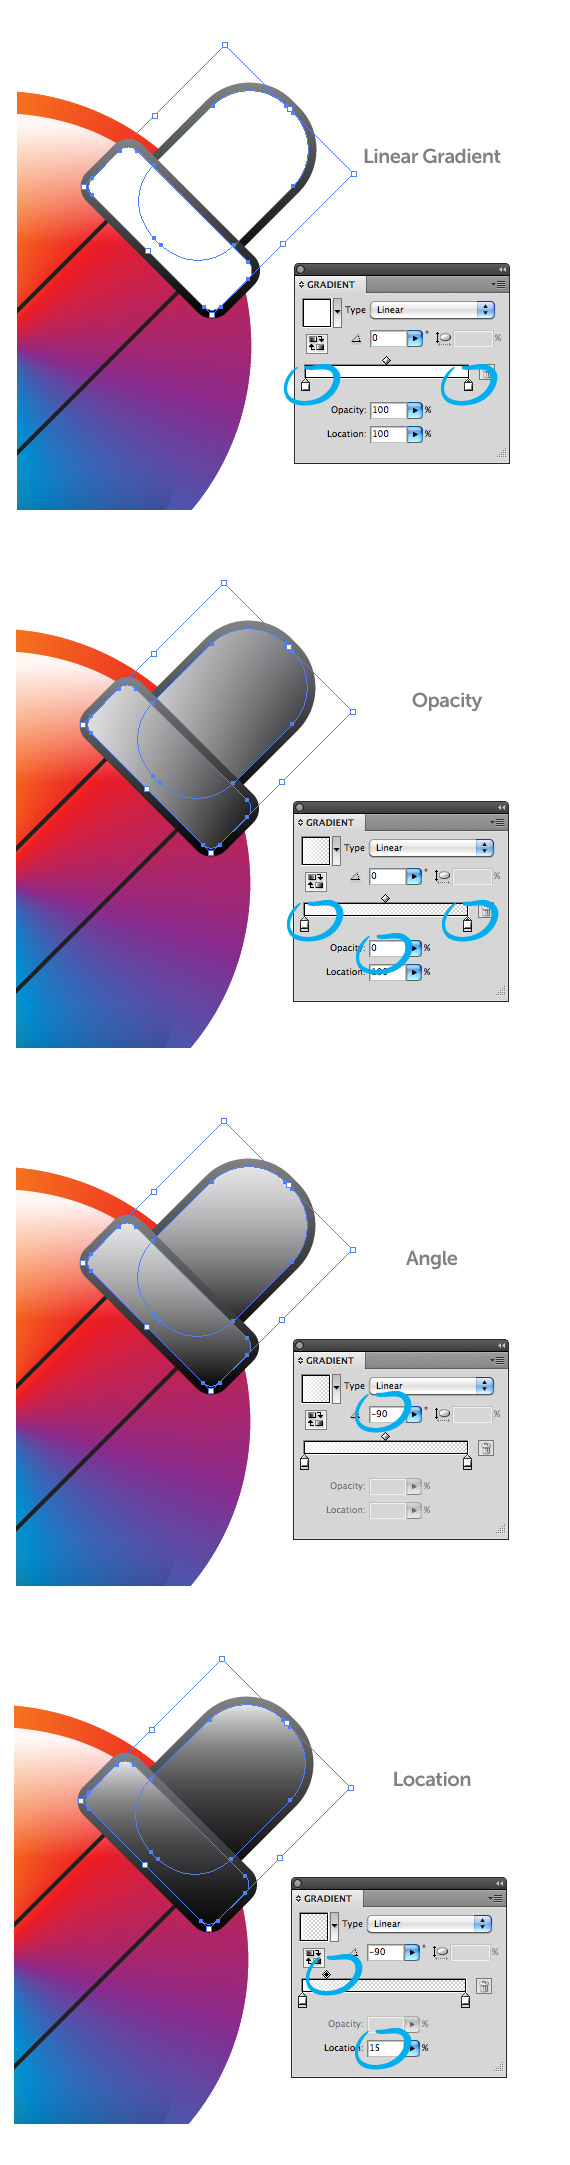
Step 18
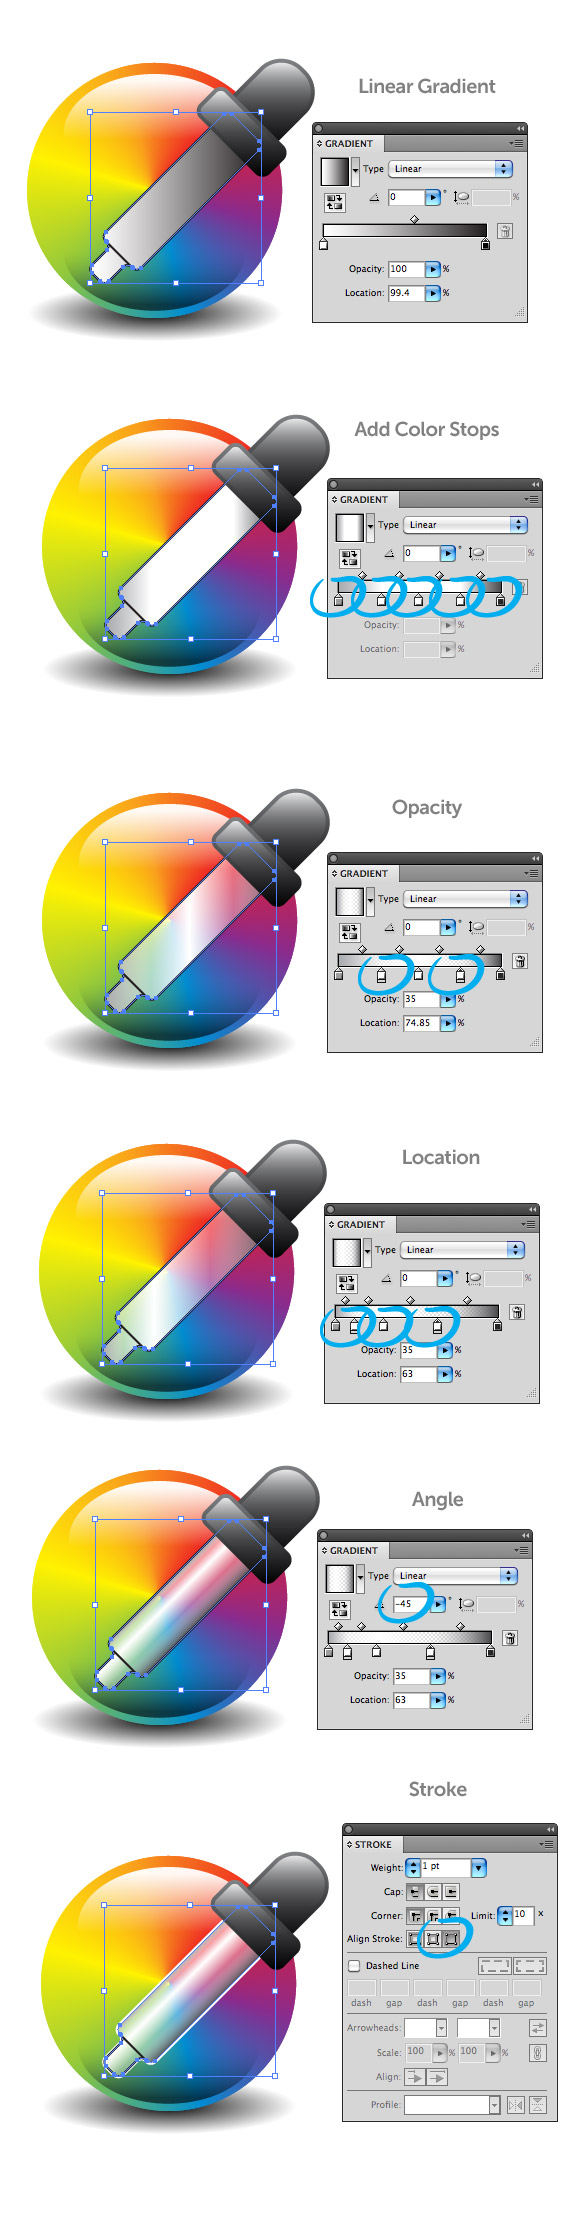
Select the main body of the dropper and fill with a linear gradient. For this gradient we are going to add three more color stop giving a total of five. Add these color stop by clicking right below the Gradient Slider in the Gradient panel. Once you added the color stop, change the first stop to gray, the next three to white, and the last one a dark gray. Change the Opacity of the first white color stop to 56 and change the Opacity of the third white color stop to 35. Change the Location of the first white color stop to 12, the Location of the second white color stop to 30, and change the Location of the third white color stop to 63. Change the Angle of the gradient to -45. Finally change the stroke to white and press the Align Stroke To Outside button from the Stroke panel.
Step 19
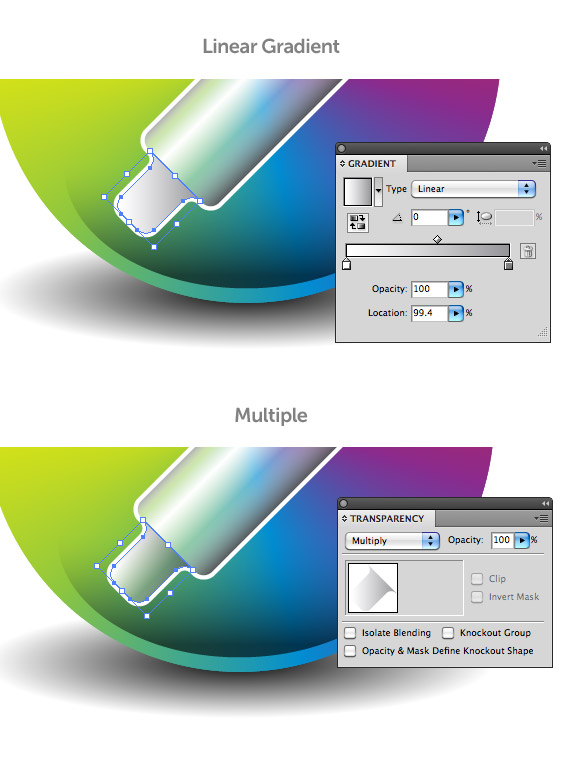
Select the shape at the bottom of the drop and fill it will a linear gradient. Change the first color stop to white and the second to a gray color. From the Transparency panel, change the Blending Mode to Multiply.
Step 20
Select the main small rectangle from the top of the dropper, Copy (Command +C), and Paste in Back (Command + B). With the copy still selected move it slightly down. Select the main dropper shape, Copy (Command + C), and Paste in Front (Command + F). Select both copies and press the Intersect button from the Pathfinder panel. Change the fill to a light gray color, change the Blending Mode to Multiply from the Transparency panel and slightly scale it to fit over the stroke of the main dropper shape.

Step 21
Select the main dropper shape, the main top shapes, and Copy (Command + C) and Paste in Back. With the copies still selected, press the Unite button from the pathfinder panel. With the Selection tool (V) move and rotate the new shape clockwise to create a shadow of the dropper.
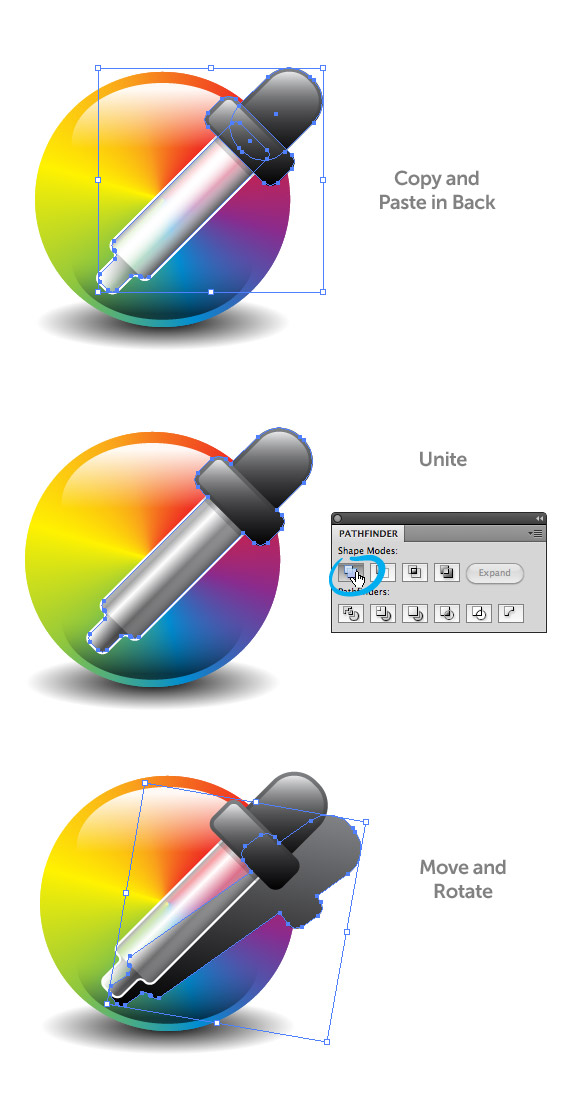
Step 22
Create a ellipse the size of the color wheel, select the ellipse and shadow shape, and Intersect them.
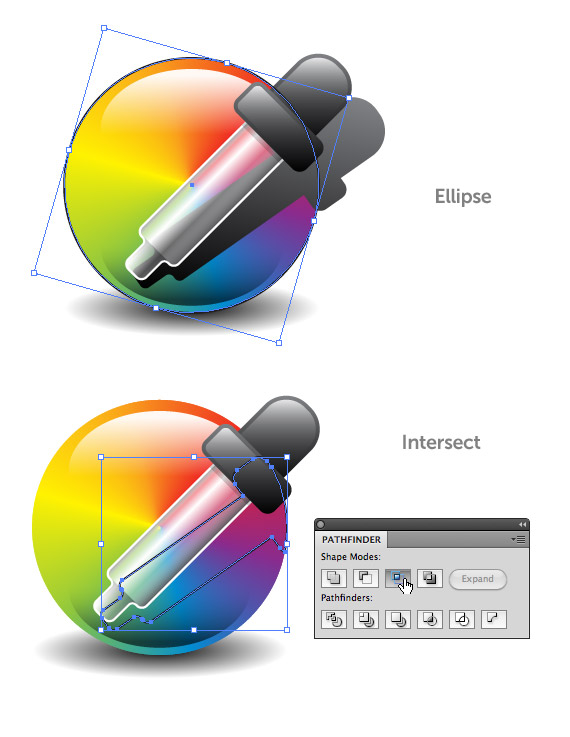
Step 23
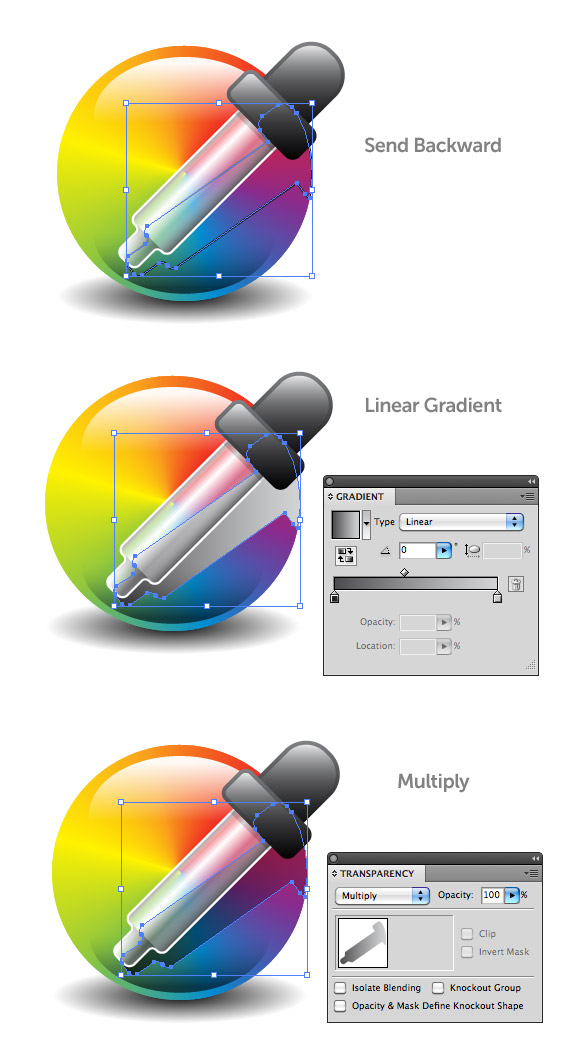
Select the new shape and go Object > Arrange > Send Backward (Command +[) until the shape is behind the original eyedropper shapes. Fill the shape with a linear gradient, change the first color stop to a dark gray, and the second color stop to a light gray. Change the Blending Mode to Multiply from the Gradient panel and you are all done!
Conclusion
That wasn’t too bad was it? This tutorial uses some pretty basic concept that can easily be applied to other vector illustrations, icons, and more. What can you come up with?


In this tutorial I will show you how to create a color picker icon from some blends, gradients, and simple shapes. This icon works great for web design project and in user interface design. Moreover, you can use the techniques in this tutorial in other icon, web, and print projects. Let’s get started!
Final Image
Take a look at what we will be creating.
Preparation
There isn’t much preparation needed for this tutorial. All you need is Illustrator CS4 or CS5 and a beginning to intermediate knowledge of how to use the program.
Step 1
With the Line Segment Tool (/), create a path that is about 80 px tall. Make sure the new path has a 1 pt stroke and change the stroke color to an orange.
Step 2
With the line selected, choose Effect > Distort and Transform > Transform. In the Transform Effect dialog, change the number of copies to 6, select the bottom center reference point in the Reference Point Locator, and set the Angle to 60. Generating six copied will place one copy in front of the original. We want to do this so we will have a complete blend in the next couple of steps.
Step 3
With the transformed line selected, choose Object > Expand Appearance and Ungroup (Command +Shift + G). Change to stroke colors to primary (red, yellow, blue) and secondary colors (orange, purple, green).
Step 4
Select all the strokes and choose Object > Blend > Make (Command + Alt/Option + B).
Step 5
Create an ellipse within the blend with the Ellipse tool (L) centered over the blend. Select the ellipse and blend and choose Object > Clipping Mask > Make (Command + 7).
Step 6
Create another ellipse about half the height and slightly smaller width as the previous ellipse. Place it close to the top side of the masked blend. Change the fill of the new ellipse to a linear gradient and in the Gradient panel, change the Location to -90, change both colors stops to white, change the opacity of the second color stop to 0, and change the middle point Location to 30.
Step 7
Copy (Command + C) the highlight ellipse and Paste in Front (Command + F). Move and rotate the copy to the bottom side of the mask blend. Change the first color stop in the gradient to a light gray and set the Blending Mode to Multiply from the Transparency panel.
Step 8
Create another ellipse about the size of the main masked blend and fill it with a radial gradient. Make sure the first color stop in the radial gradient is black and the second is white. Squish the ellipse and place it behind all other artwork. Set the Blending Mode of the ellipse to Multiply and change the opacity to 50 percent.
Step 9
Now that we have the color wheel done, we can concentrate on the eyedropper. Create a rectangle with the Rectangle tool (M) about three fourths the height of the color wheel. Create another smaller rectangle about a fifth the height of the main rectangle and half its width and place at the bottom of the main rectangle.
Step 10
Select both rectangles and press the Unite button from the Pathfinder panel. Next, choose Effect > Stylize > Round Corners. In the Round Corner Dialog, change the Radius to 3 px. Next, choose Object > Expand Appearance.
Step 11
Copy (Command + C) the eyedropper shape and Paste in Front (Paste in Front). Create another rectangle that covers the bottom part of the eyedropper. Select the main copy and the smaller rectangle and press the Intersect button from the Pathfinder panel.
Step 12
Create a rectangle towards the top of the main eyedropper shape. Make the new rectangle about double the width and one sixth the height of the main eyedropper shape. Next, choose Effect > Stylize > Round Corners and in the Round Corner Dialog, change the Radius to 5 px.
Step 13
Create another rectangle slightly wider and about a fourth the size of the main eyedropper shape. Place the shape towards the top of the previous rectangle and round the corners 15 px.
Step 14
Select the top eyedropper shapes and go Object > Expand Appearance. Next, go Object > Path > Offset Path and in the Offset Path dialog change the Offset to -2 px. This value might be different depending on the original size of your shapes.
Step 15
Now that we have all the shapes done for the eyedropper, we can place them over the color wheel we already created. Creating the shapes and not filling in before we place the dropper makes it easier to see the white and transparency parts of the gradients when we fill them. So, place your eyedropper shapes over the color wheel at a 45 degree angle.
Step 16
First, select the smaller rectangle and its offset from the top of the dropper and go Object > Arrange > Bring To Front (Command + Shift + ]). Select the original top shapes (not the offsets) and fill with a linear gradient. Change the first color stop in the gradient to a dark gray and the second color stop to black. Change the Angle to -90 in the Gradient panel.
Step 17
Select the offsets of the upper rectangle shape and fill with a linear gradient. Change both color stop in the gradient to white. In the Gradient panel, change the opacity of the first color stop to 80 and the second to 0. Change the Angle to -90 and change the middle point Location of the gradient to 15.
Step 18
Select the main body of the dropper and fill with a linear gradient. For this gradient we are going to add three more color stop giving a total of five. Add these color stop by clicking right below the Gradient Slider in the Gradient panel. Once you added the color stop, change the first stop to gray, the next three to white, and the last one a dark gray. Change the Opacity of the first white color stop to 56 and change the Opacity of the third white color stop to 35. Change the Location of the first white color stop to 12, the Location of the second white color stop to 30, and change the Location of the third white color stop to 63. Change the Angle of the gradient to -45. Finally change the stroke to white and press the Align Stroke To Outside button from the Stroke panel.
Step 19
Select the shape at the bottom of the drop and fill it will a linear gradient. Change the first color stop to white and the second to a gray color. From the Transparency panel, change the Blending Mode to Multiply.
Step 20
Select the main small rectangle from the top of the dropper, Copy (Command +C), and Paste in Back (Command + B). With the copy still selected move it slightly down. Select the main dropper shape, Copy (Command + C), and Paste in Front (Command + F). Select both copies and press the Intersect button from the Pathfinder panel. Change the fill to a light gray color, change the Blending Mode to Multiply from the Transparency panel and slightly scale it to fit over the stroke of the main dropper shape.
Step 21
Select the main dropper shape, the main top shapes, and Copy (Command + C) and Paste in Back. With the copies still selected, press the Unite button from the pathfinder panel. With the Selection tool (V) move and rotate the new shape clockwise to create a shadow of the dropper.
Step 22
Create a ellipse the size of the color wheel, select the ellipse and shadow shape, and Intersect them.
Step 23
Select the new shape and go Object > Arrange > Send Backward (Command +[) until the shape is behind the original eyedropper shapes. Fill the shape with a linear gradient, change the first color stop to a dark gray, and the second color stop to a light gray. Change the Blending Mode to Multiply from the Gradient panel and you are all done!
Conclusion
That wasn’t too bad was it? This tutorial uses some pretty basic concept that can easily be applied to other vector illustrations, icons, and more. What can you come up with?
Po
adminlogo