You’re probably struggling by trying to figure out how on earth the designer got to create that amazing logo. Curved text really does look cool, right?
This resource is usually applied in logo and poster design; so, defining the best option to curve your text could make a big difference to your work.
As in so many other scenarios, there’s more than one way to get the result you want, and you’re probably going to need to try them all before you decide which one is your favorite.
But, in this case, I’m going to show you the easiest way to curve text, and also describe in a few words the other alternative, in case you feel like you want to jump into another tutorial to learn it!
The easiest way to curve text would be to use the “Warp” feature. You can find it in two locations: under the “Effect” tab, located on the top menu bar; or you can go to the same menu bar under the tab “Object”, click on “Envelope Distort”, and then choose “Make with Warp”.
This amazing and intuitive feature will give you the option to distort your text and bring it a curved appearance thanks to the different shape presets listed on the menu box.
You can build an arc, a bulge, a flag, or a wave, among others. What´s more: once in the options, you can play around with the settings to get the result you want and get closer to your dreamed design.
But don´t freak out! I will explain you how to use this tool in 6 simple steps.
You can add a quick effect to curve your text by using the “Warp” effect. Or, in case you want to get deeper, go for “Type on a Path Tool” and get an easier shape edition. To use one of the preset “Warp” shapes for the envelope, go to “Effect” and then “Warp”. Another possibility is through “Object”, on the same menu bar, by clicking on “Envelop Distort”, and then on “Make with Warp”.
How to Curve Text in Illustrator in 6 Simple Steps
This is perfect for when you want to give that final touch to the logo you’ve been working on, or maybe for a poster or a T-Shirt design. But the best part is how quickly you can apply it!
After you’re done applying the effect, you can keep editing your text ad infinitum: you can change the text, the color, the font, and so on. Don´t worry: it’s not a signed contract!
Just have in mind this is a great tool when it comes to make an arc or a flag shape, but probably not the best if you want it to look more like a circle, or basically, any other shape that isn’t listed on the drop down menu shown in the text box.
Also, it could turn out that you are making the curve too deep; so, if the text is too short, it can begin to distort the letters in a way that might not look so good. If you write something, you´ll probably want people to understand it (unless you´re a quantum physicist…).
So, if that’s the case, I think you should test the waters with Illustrator’s other tool for curving text, “Type on a Path.”
This other tool can give you more independence regarding the type of shape you use, because it can be applied to all of them, and you`ll still be able to edit the path after you´ve already typed on it.
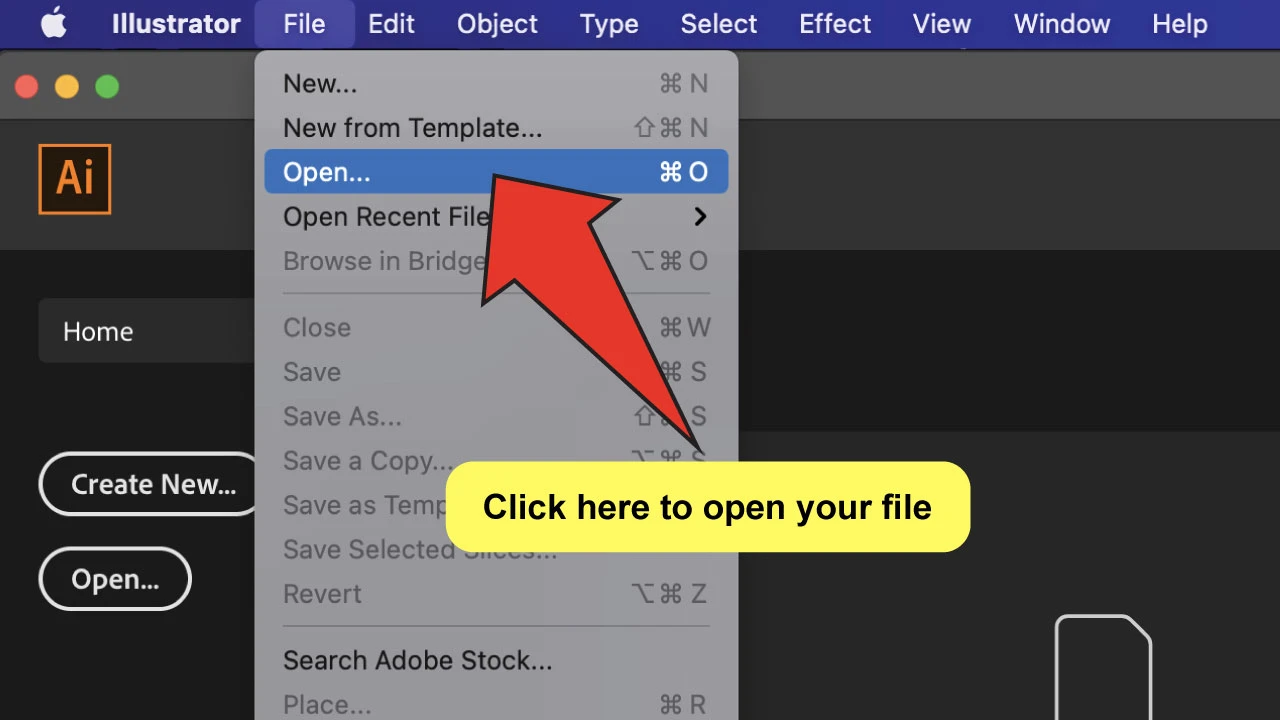
Step 1:
Open the file you want to work with.
If you’re already working on a project and you just need to curve some text, skip this step. But if you are not, just head to “File” and then to “Open” to be able to follow the next steps.
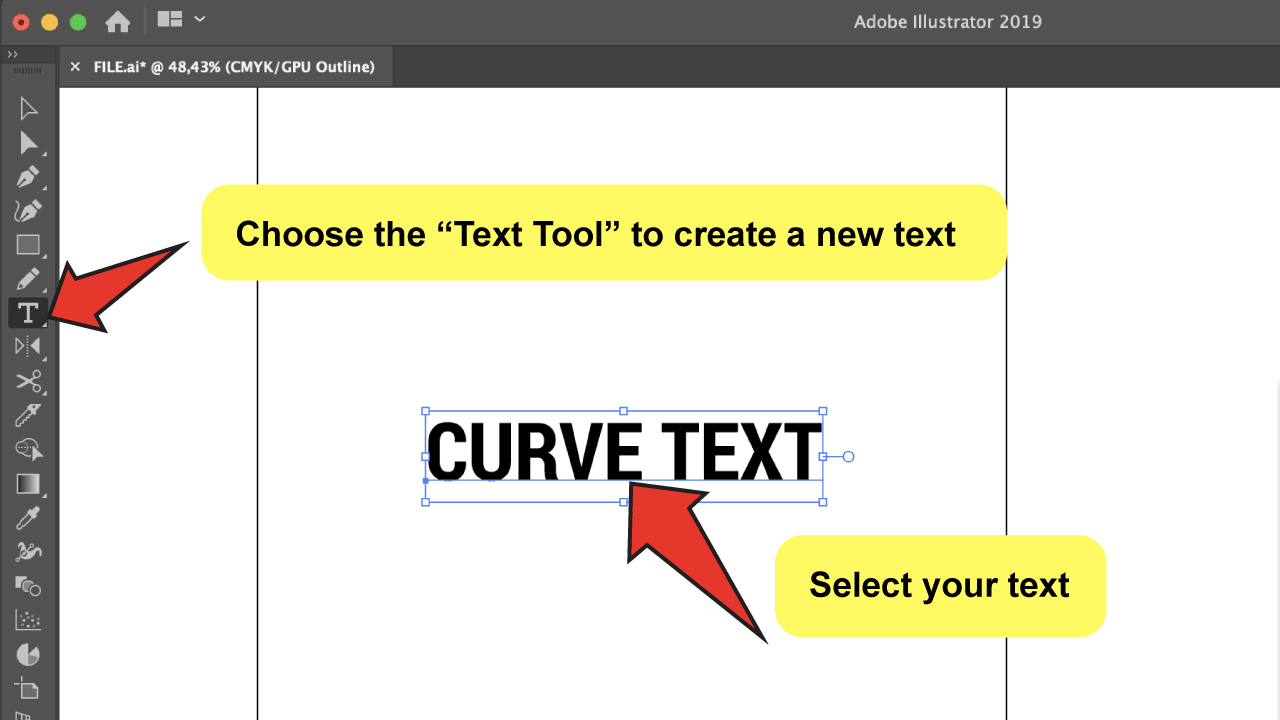
Step 2:
Select the text you want to curve. If you haven’t typed it yet, you can paste or write it yourself using the “Text Tool”. The icon looks like a capital T in the toolbar.
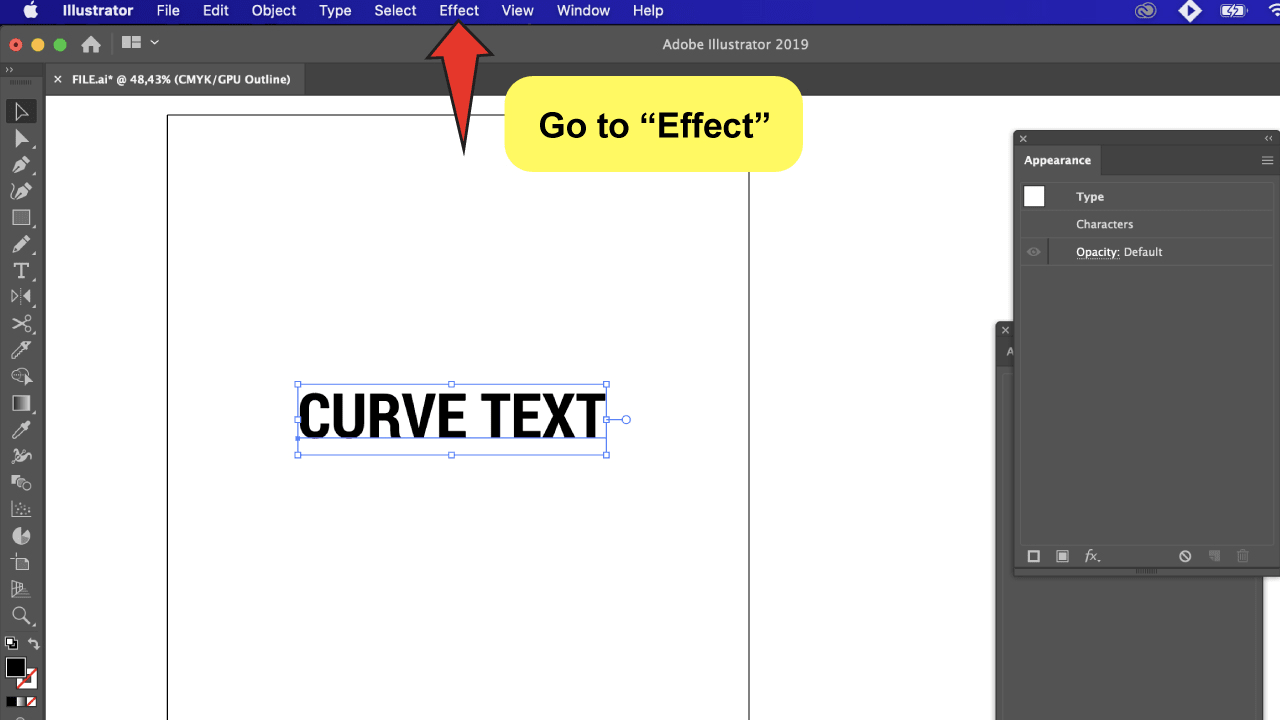
Step 3:
Go to “Effect” option on the main top menu. You’ll see this option on the menu that lies at the top of your project´s area.
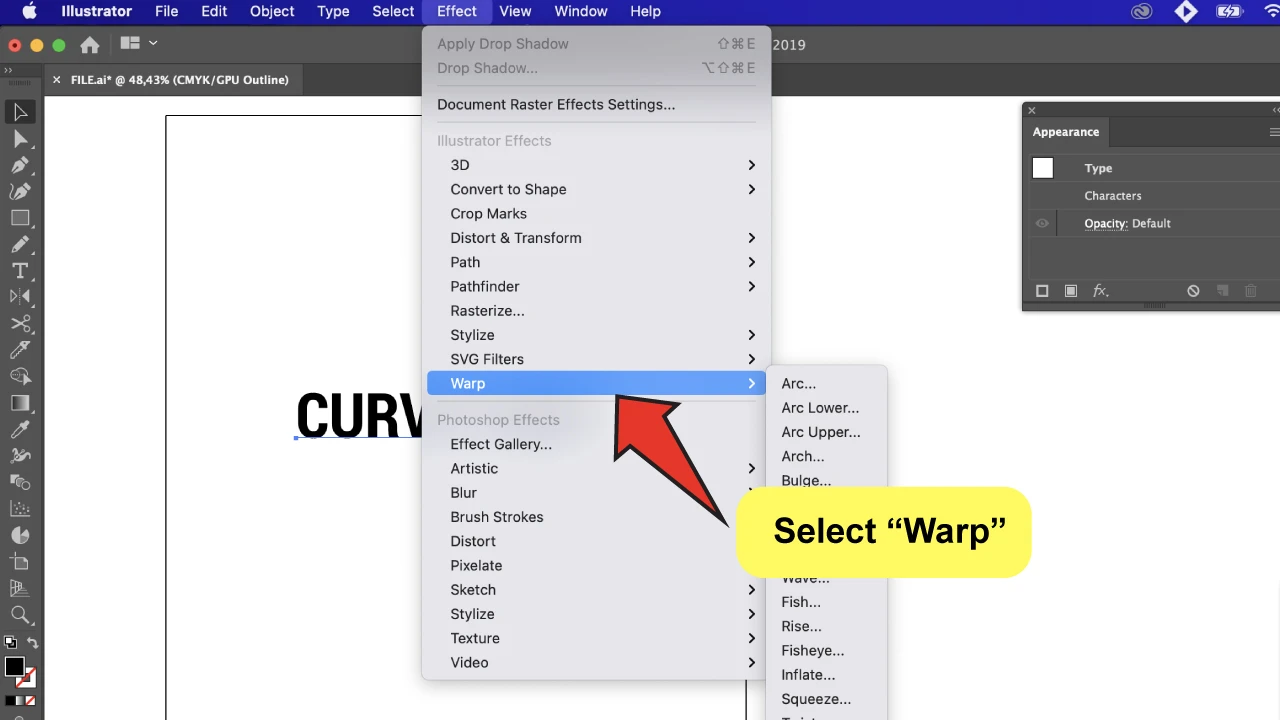
Step 4:
Click on the “Warp” option.
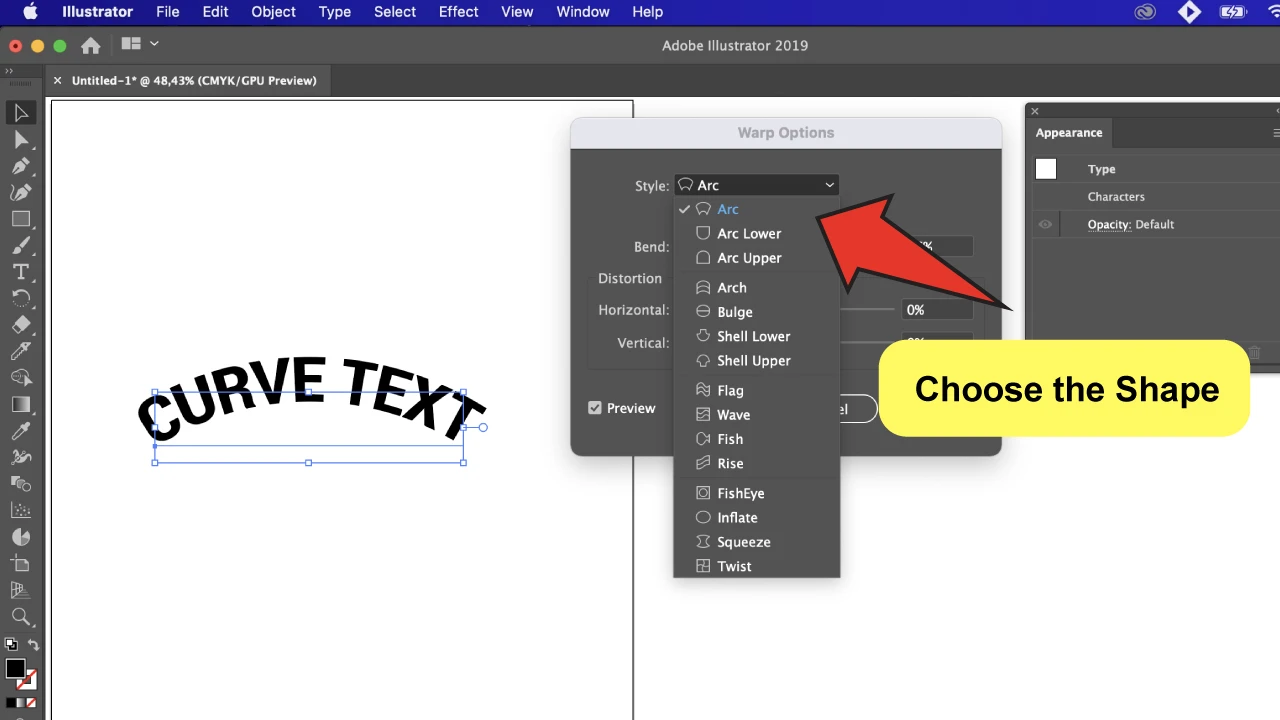
You will see a list of all of the different shapes you can warp your text into. These are the options to choose from: Arc, Bulge, Shell, Flag, Wave, Fish, Rise, Fisheye, Inflate, Squeeze, and Twist.
Step 5:
Choose the shape you want to warp your text with.
Select the shape you prefer, and don’t worry: as i said before, you can change it afterwards if you want. The same list will appear inside of the text box with the settings.
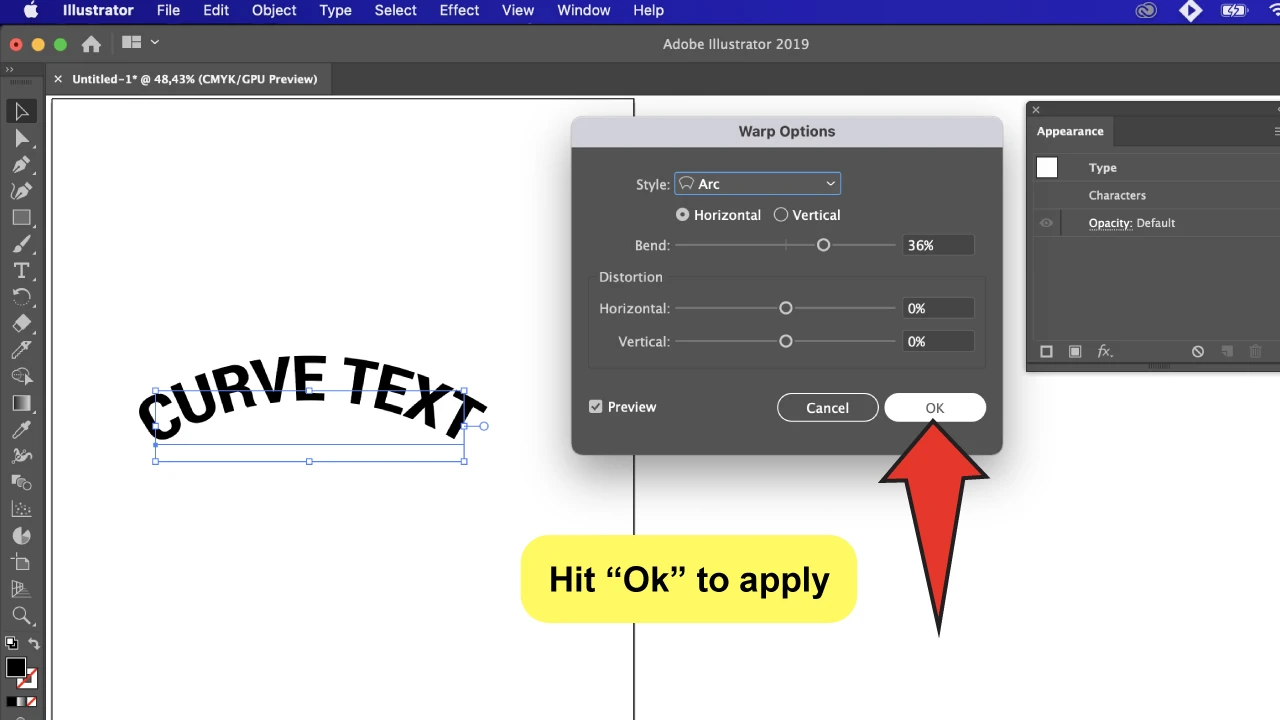
Click on “Preview”, at the bottom of the box, to see the changes as you make them. You can play around with the percentages to adjust, but the default settings will already provide you a basic shape.
Step 6:
Click “Ok” button to apply the effect. If you enabled the “Preview” mode, you will see the same settings that you chose in the dialog box applied.
Wrap Up
Yay! You’ve done it
Keep in mind that once you’ve transformed your text into a shape after picking the right settings, you’re not all done yet. You are training your patience, my friend!
You might want to finalize it by expanding the appearance of the object so it can become a true vector. Thus, you could work with it as if it was any other object!
You can do this by going to “Object” and then clicking on “Expand”.
And one more observation before I go: you can still convert your text to outlines after having applied the effect. I recommend this only in case you are sure of the text and you aren’t planning on edit the text later, also in case you have to send this to print.
Frequently Asked Questions About How to Curve Text in Illustrator
How do you convert text to outlines on a curve in Illustrator?
You can directly select the text, and convert it to outlines by pressing the keyboard shortcut “Command+Shift+O”.
How can I edit a text I´ve already curved?
You can edit the curved text directly on the path, by using the “Text” tool and simply click on the text, and change text, font, size, or colors.
Can I change the shape after I’m done applying the effect?
Totally! You can always go to your “Appearance” panel, which you will reach by going to the top menu bar, and clicking on “Window”. You will see a layer named under the shape you´ve chosen. So double click on it, and change the settings as you wish!

You’re probably struggling by trying to figure out how on earth the designer got to create that amazing logo. Curved text really does look cool, right?
This resource is usually applied in logo and poster design; so, defining the best option to curve your text could make a big difference to your work.
As in so many other scenarios, there’s more than one way to get the result you want, and you’re probably going to need to try them all before you decide which one is your favorite.
But, in this case, I’m going to show you the easiest way to curve text, and also describe in a few words the other alternative, in case you feel like you want to jump into another tutorial to learn it!
The easiest way to curve text would be to use the “Warp” feature. You can find it in two locations: under the “Effect” tab, located on the top menu bar; or you can go to the same menu bar under the tab “Object”, click on “Envelope Distort”, and then choose “Make with Warp”.
This amazing and intuitive feature will give you the option to distort your text and bring it a curved appearance thanks to the different shape presets listed on the menu box.
You can build an arc, a bulge, a flag, or a wave, among others. What´s more: once in the options, you can play around with the settings to get the result you want and get closer to your dreamed design.
But don´t freak out! I will explain you how to use this tool in 6 simple steps.
You can add a quick effect to curve your text by using the “Warp” effect. Or, in case you want to get deeper, go for “Type on a Path Tool” and get an easier shape edition. To use one of the preset “Warp” shapes for the envelope, go to “Effect” and then “Warp”. Another possibility is through “Object”, on the same menu bar, by clicking on “Envelop Distort”, and then on “Make with Warp”.
How to Curve Text in Illustrator in 6 Simple Steps
This is perfect for when you want to give that final touch to the logo you’ve been working on, or maybe for a poster or a T-Shirt design. But the best part is how quickly you can apply it!
After you’re done applying the effect, you can keep editing your text ad infinitum: you can change the text, the color, the font, and so on. Don´t worry: it’s not a signed contract!
Just have in mind this is a great tool when it comes to make an arc or a flag shape, but probably not the best if you want it to look more like a circle, or basically, any other shape that isn’t listed on the drop down menu shown in the text box.
Also, it could turn out that you are making the curve too deep; so, if the text is too short, it can begin to distort the letters in a way that might not look so good. If you write something, you´ll probably want people to understand it (unless you´re a quantum physicist…).
So, if that’s the case, I think you should test the waters with Illustrator’s other tool for curving text, “Type on a Path.”
This other tool can give you more independence regarding the type of shape you use, because it can be applied to all of them, and you`ll still be able to edit the path after you´ve already typed on it.
Step 1:
Open the file you want to work with.
If you’re already working on a project and you just need to curve some text, skip this step. But if you are not, just head to “File” and then to “Open” to be able to follow the next steps.
Step 2:
Select the text you want to curve. If you haven’t typed it yet, you can paste or write it yourself using the “Text Tool”. The icon looks like a capital T in the toolbar.
Step 3:
Go to “Effect” option on the main top menu. You’ll see this option on the menu that lies at the top of your project´s area.
Step 4:
Click on the “Warp” option.
You will see a list of all of the different shapes you can warp your text into. These are the options to choose from: Arc, Bulge, Shell, Flag, Wave, Fish, Rise, Fisheye, Inflate, Squeeze, and Twist.
Step 5:
Choose the shape you want to warp your text with.
Select the shape you prefer, and don’t worry: as i said before, you can change it afterwards if you want. The same list will appear inside of the text box with the settings.
Click on “Preview”, at the bottom of the box, to see the changes as you make them. You can play around with the percentages to adjust, but the default settings will already provide you a basic shape.
Step 6:
Click “Ok” button to apply the effect. If you enabled the “Preview” mode, you will see the same settings that you chose in the dialog box applied.
Wrap Up
Yay! You’ve done it
Keep in mind that once you’ve transformed your text into a shape after picking the right settings, you’re not all done yet. You are training your patience, my friend!
You might want to finalize it by expanding the appearance of the object so it can become a true vector. Thus, you could work with it as if it was any other object!
You can do this by going to “Object” and then clicking on “Expand”.
And one more observation before I go: you can still convert your text to outlines after having applied the effect. I recommend this only in case you are sure of the text and you aren’t planning on edit the text later, also in case you have to send this to print.
Frequently Asked Questions About How to Curve Text in Illustrator
How do you convert text to outlines on a curve in Illustrator?
You can directly select the text, and convert it to outlines by pressing the keyboard shortcut “Command+Shift+O”.
How can I edit a text I´ve already curved?
You can edit the curved text directly on the path, by using the “Text” tool and simply click on the text, and change text, font, size, or colors.
Can I change the shape after I’m done applying the effect?
Totally! You can always go to your “Appearance” panel, which you will reach by going to the top menu bar, and clicking on “Window”. You will see a layer named under the shape you´ve chosen. So double click on it, and change the settings as you wish!
adminlogo