With designers relying more and more on vectors over the past few years designers have been looking for ways fast and effective methods of converting bitmap graphics into the scalable vector format. Originally Adobe utilized a program known as Streamlined but with the release of Adobe Creative Suite 2 this product was discontinued as users were introduced to the new, powerful Live Trace.
What Are Vector Graphics and Why Use Them?
Adobe Illustrator is a program created by Adobe that utilizes vector graphics as its primary method of creation. Vector graphics is the use of geometrical primitives such as points, lines, curves, and shapes or polygon(s), which are all based on mathematical equations, to represent images in computer graphics (Definition). Due to the mathematical nature of vector graphics, it is possible for these forms of graphics to be resized both larger and smaller without any loss in quality. This makes vector graphics one of the most effective methods of creating drawings and illustrations.
What is Adobe Live Trace?
Adobe’s Live Trace function found within illustrator is a method of converting a bitmap graphic into a similar vector graphic consisting of primarily paths and shapes. To use Live Trace there are two primary ways to begin. The first is from the “Object” menu at the top of the screen. From here in the sixth group you will find “Live Trace” and all of the options that come with it. Similarly, you may simply click the “Live Trace” button found along the top menu bar. From each you will receive different options as to you would like to use Live Trace.
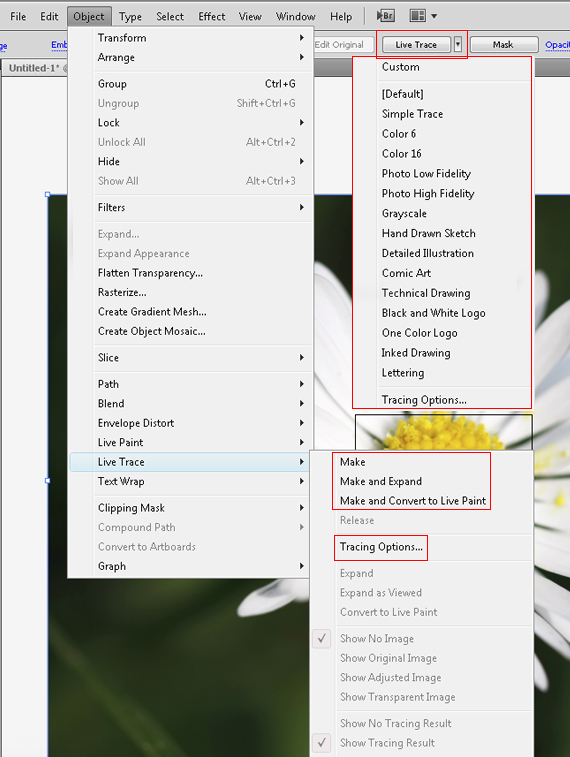
The most basic way is to simple choose one of the presets found from the “Live Trace” button found along the top menu bar or to choose “Make”. The results from this would range from simple a simplistic black and white image to a more detailed color image.

For most projects though these options simply won’t suffice and I highly recommend that professional or amateur designers DO NOT use the presets or default settings found within Live Trace.
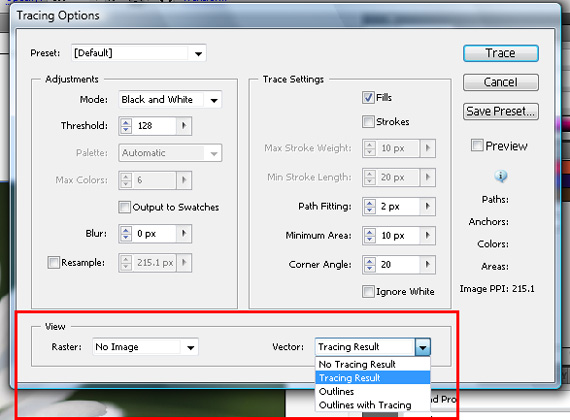
Live Trace Options Panel

- Preset – Presets are the fastest way to toggle between settings within Adobe Illustrator. Though these are a good place to start, most projects will require tweaking to other settings to receive results as the designer wishes [or will require time after the trace to clean up it up]
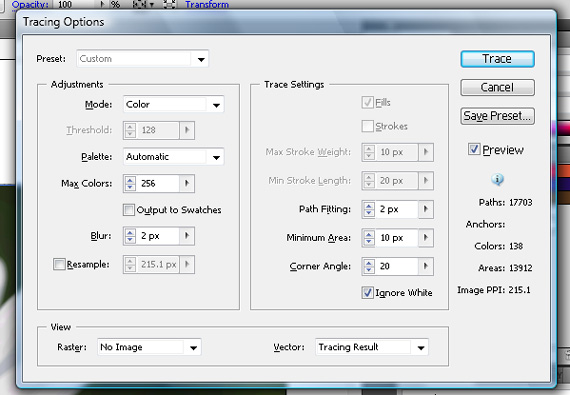
- Mode – The Mode option allows the designer to choose whether the final vector will be in Black and White [1-bit], Grayscale [8-bit], or Color [8-bit].
- Threshold – The Threshold option will allow the designer to toggle what Adobe Illustrator views as blacks and white when working in Black and White mode. An example would be with a grayscale image, a high threshold level will result in more black objects while a lower threshold level will result in more white objects. Setting the threshold too low or too high can result in a loss of image quality.
- Palette – The Palette option allows for the designer to choose between Adobe Illustrator choosing the appropriate colors or the user to decide the colors to be used in within the piece. To change this from Automatic you must first load a custom swatch library the palette drop down will include these as available palettes. This forces live trace to use only colors found within that palette.
- Max Colors – The Maximum Colors option allows the designer to choose the maximum number of color variations found within the final image. The more colors, the larger the file size will be and the more memory the computer will need to complete the trace.
- Output to Swatches – The Output to Swatches checkbox will send the colors used in the image to your swatch box for easy access at a later point.
- Blur – The Blur Option allows for the adjustment of the Gaussian blur which is used before finding the edges of the image. For most situations, the higher the blur the vaguer the shapes will become. Blur is especially useful when trying to remove noise from a traced image.
- Resample – The Resample option allows for the user to change the resolution of the source file. This can speed up how long the trace will take as it lowers the scanning resolution of the image.
- Fill / Stroke – These two checkboxes will change how adobe illustrator works with the pieces. By checking “Fill” Adobe Illustrator will create a vector that uses fills to create color and a solid object. On the other hand, checking the “Stroke” checkbox will allow you to only stroke the paths which Live Trace creates. This can be helpful if you would like to place the trace above a background that you wish to be able to see. Generally, a fill will create a more complex result that will match the original image best while strokes will create less anchor points but a less exact trace.
- Max Stroke Weight – The Maximum Stroke Weight option allows the designer to choose what areas will be considered a “Fill” and what will be considered a “Stroke”. Anything larger than the Maximum Stroke Weight will be considered a “Fill”. This is only available when stroke is turned on.
Min Stroke Length – The Minimum Stroke Length option allows the user to choose the minimum length of required for a stroke to be included in the final image. Any value lower than this number will not be included in the final image. This is only available when stroke is turned on.
- Path Fitting – The Path Fitting option allows designers to decide how closely Adobe Illustrator will follow the lines within the source image. Setting this value lower will force Illustrator to more closely follow the lines within the source image while setting this higher will allow for smoother and more relaxed lines overall.
- Minimum Area – The Minimum area option allows users to choose what the smallest area that will be traced is.
- Corner Angle – The Corner Angle option allows for users to set how sharp the corners can be. This option is measured in degrees. Think of zero as a flat line while 180 would be a very hard corner. The default for this setting is 20.
- Ignore White – The Ignore White checkbox allows for users to decide whether Illustrator will leave the areas that include white transparent [checked] or if they shall be filled in with white [unchecked].
- Preview – The Preview checkbox allows you to toggle live preview. Live preview is helpful when tweaking the settings as it allows you to see what the final result will be. If your computer is on the older side this may be to taxing in terms of resources yet it is one of the most beneficial options within the “Tracing Options” panel of Live Trace.
Expanding:
Once you have your image you can either leave it as a single layer trace or you can expand it into vector paths which you may then edit with the Direct Selection Tool [A]. To expand a newly traced item, you may either go to Object > Live Trace > “Expand”, Object > Live Trace > “Expand as Viewed”, or click “Expand” within the control palette along the top.

For those wondering, the difference between “Expand” and “Expand as Viewed” are rather simple. “Expand” will convert the entire tracing to vectors paths. “Expand as Viewed” will look at the settings you have under the View menu of Live Trace [as shown below] and expand the image based on those settings. An example of this would be if your view options are set to viewing “Outlines with Tracing”, Adobe Illustrator would then create vector paths that have a fill and stroke of “None”.
Results:
Here are the results that I was able to achieve. Please note that as with most designer programs, you will become better with Live Trace the more that you use it.
Live Trace
With the following settings:
The result was:

With vectormagic the result was:

Note the smoother background gradients found within the vectormagic version.
When should I use Live Trace?
For many, Live Trace is a good option to begin a design when working from a picture. It allows you to save time by getting a basic vector created so that you can expand it and tweak the final results with other Illustrator tools. Even if it doesn’t give the best results each and every time, it can save you time and allow you to get more comfortable with vectors. Have fun and keep designing!
Tips:
When working with a black and white image, choose grayscale to have Adobe Illustrator include anti-aliasing.
Although Live Trace is a good starting point, oftentimes it does not include the configurability needed to create high quality vectors of complex images. For those cases a good alternative is to go to http://www.vectormagic.com.
Start in black and white mode – this allows you the see the most contrast that adobe illustrator is finding and allows the output of better quality images. When ready to tweak your settings, change to grayscale or color.
Live Trace is integrated greatly with Live Paint for adding color to your results, experiment with this to get some unique and fun results!
View author’s website at razerdesign.com.
Follow author on Twitter.
SOURCES
Stock Photo Used:
Sources consulted while compiling tutorial:

With designers relying more and more on vectors over the past few years designers have been looking for ways fast and effective methods of converting bitmap graphics into the scalable vector format. Originally Adobe utilized a program known as Streamlined but with the release of Adobe Creative Suite 2 this product was discontinued as users were introduced to the new, powerful Live Trace.
What Are Vector Graphics and Why Use Them?
Adobe Illustrator is a program created by Adobe that utilizes vector graphics as its primary method of creation. Vector graphics is the use of geometrical primitives such as points, lines, curves, and shapes or polygon(s), which are all based on mathematical equations, to represent images in computer graphics (Definition). Due to the mathematical nature of vector graphics, it is possible for these forms of graphics to be resized both larger and smaller without any loss in quality. This makes vector graphics one of the most effective methods of creating drawings and illustrations.
What is Adobe Live Trace?
Adobe’s Live Trace function found within illustrator is a method of converting a bitmap graphic into a similar vector graphic consisting of primarily paths and shapes. To use Live Trace there are two primary ways to begin. The first is from the “Object” menu at the top of the screen. From here in the sixth group you will find “Live Trace” and all of the options that come with it. Similarly, you may simply click the “Live Trace” button found along the top menu bar. From each you will receive different options as to you would like to use Live Trace.
The most basic way is to simple choose one of the presets found from the “Live Trace” button found along the top menu bar or to choose “Make”. The results from this would range from simple a simplistic black and white image to a more detailed color image.
For most projects though these options simply won’t suffice and I highly recommend that professional or amateur designers DO NOT use the presets or default settings found within Live Trace.
Live Trace Options Panel
Min Stroke Length – The Minimum Stroke Length option allows the user to choose the minimum length of required for a stroke to be included in the final image. Any value lower than this number will not be included in the final image. This is only available when stroke is turned on.
Expanding:
Once you have your image you can either leave it as a single layer trace or you can expand it into vector paths which you may then edit with the Direct Selection Tool [A]. To expand a newly traced item, you may either go to Object > Live Trace > “Expand”, Object > Live Trace > “Expand as Viewed”, or click “Expand” within the control palette along the top.
For those wondering, the difference between “Expand” and “Expand as Viewed” are rather simple. “Expand” will convert the entire tracing to vectors paths. “Expand as Viewed” will look at the settings you have under the View menu of Live Trace [as shown below] and expand the image based on those settings. An example of this would be if your view options are set to viewing “Outlines with Tracing”, Adobe Illustrator would then create vector paths that have a fill and stroke of “None”.
Results:
Here are the results that I was able to achieve. Please note that as with most designer programs, you will become better with Live Trace the more that you use it.
Live Trace
With the following settings:
The result was:
With vectormagic the result was:
Note the smoother background gradients found within the vectormagic version.
When should I use Live Trace?
For many, Live Trace is a good option to begin a design when working from a picture. It allows you to save time by getting a basic vector created so that you can expand it and tweak the final results with other Illustrator tools. Even if it doesn’t give the best results each and every time, it can save you time and allow you to get more comfortable with vectors. Have fun and keep designing!
Tips:
When working with a black and white image, choose grayscale to have Adobe Illustrator include anti-aliasing.
Although Live Trace is a good starting point, oftentimes it does not include the configurability needed to create high quality vectors of complex images. For those cases a good alternative is to go to http://www.vectormagic.com.
Start in black and white mode – this allows you the see the most contrast that adobe illustrator is finding and allows the output of better quality images. When ready to tweak your settings, change to grayscale or color.
Live Trace is integrated greatly with Live Paint for adding color to your results, experiment with this to get some unique and fun results!
View author’s website at razerdesign.com.
Follow author on Twitter.
SOURCES
Stock Photo Used:
Sources consulted while compiling tutorial:
adminlogo