The Swatches Palette in Illustrator can be a very powerful tool for someone who knows how to use it. Most of us already know that the Swatches Palette stores colors for us to use in our designs, but did you also know that the swatches palette can store vector data and that those vectors can then be applied as fills or strokes? If not, I hope that this short tutorial will help you fully understand the power of using seamless patterns in the Swatches Palette.
Before we get started, download the swatch that we will be using for this tutorial and save it on your hard drive.
Now, create a new document the dimensions don’t really matter.
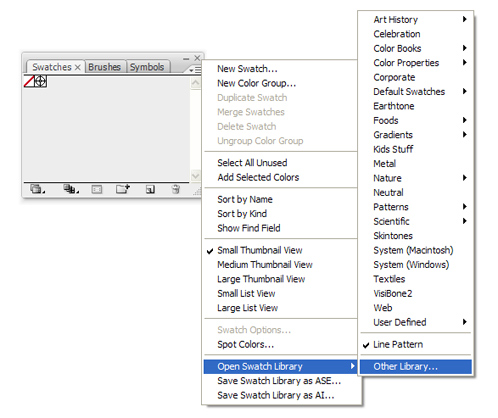 Then, open up the Swatches Palette and click the arrow on the upper right-hand side of the palette. In the fly out menu select Open Swatch Library > Other Library > and locate the swatch on your hard drive. If you saved the swatch to your Adobe Preset Swatches folder, this swatch will be available in the User Defined folder.
 With your new swatches palette open, select the rectangle tool and draw out a rectangle. Any dimensions will do.
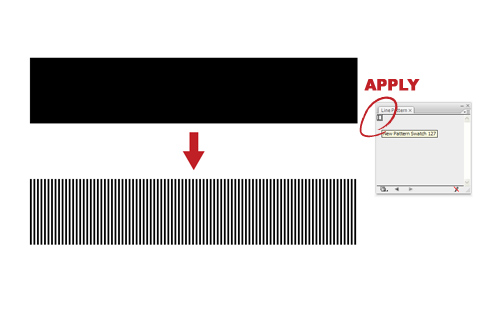
Now apply the pattern to the rectangle’s fill by selecting the rectangle and clicking on the pattern in the Swatches Palette. Your shape should now be filled with vertically spaced black lines.
You can now see how powerful the Swatches Palette can be. If you only needed spaced out vertical lines, you could stop here but in this tutorial we are going to take it a step further and show you how to apply transformations to this shape without altering the shape itself.
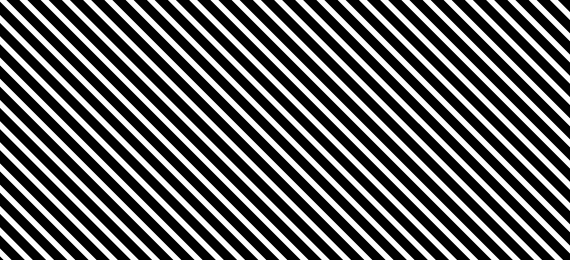
 Select the rectangle and right click it. In the menu, select Transform > Rotate. When the Rotate Dialog Box appears, rotate the lines 45 degrees by unchecking Objects and by checking Patterns. This will rotate the lines 45 degrees.
If you are pleased with how the lines look, you could again stop here but we are going to perform one more step.
 Right click on the rectangle again. Select Transform > Scale. Check the preview and Patterns boxes and uncheck Scale Strokes & Effects and Objects. Select the Uniform radio button and scale the pattern to your liking. You can see how the pattern gets larger and smaller depending on the percentage that you enter.
I hope that this short tutorial will help you explore the power of seamless patterns and hopefully you can start using them more often in your designs.

The Swatches Palette in Illustrator can be a very powerful tool for someone who knows how to use it. Most of us already know that the Swatches Palette stores colors for us to use in our designs, but did you also know that the swatches palette can store vector data and that those vectors can then be applied as fills or strokes? If not, I hope that this short tutorial will help you fully understand the power of using seamless patterns in the Swatches Palette.
Before we get started, download the swatch that we will be using for this tutorial and save it on your hard drive.
Now, create a new document the dimensions don’t really matter.
Now apply the pattern to the rectangle’s fill by selecting the rectangle and clicking on the pattern in the Swatches Palette. Your shape should now be filled with vertically spaced black lines.
You can now see how powerful the Swatches Palette can be. If you only needed spaced out vertical lines, you could stop here but in this tutorial we are going to take it a step further and show you how to apply transformations to this shape without altering the shape itself.
If you are pleased with how the lines look, you could again stop here but we are going to perform one more step.
I hope that this short tutorial will help you explore the power of seamless patterns and hopefully you can start using them more often in your designs.
adminlogo